
Markdown headings in TextMate
May 18, 2006 at 11:16 PM by Dr. Drang
A quick little TextMate command/macro pair for handling Markdown headings using the setext format. That’s the one where you use “underlining” to distinguish headings from other text. Like this
Section
=======
for an <h1> heading and this
Subsection
----------
for an <h2> heading.
TextMate ships with commands that do the underlining. After you’ve typed in the heading text, you move to the next line, type a single “=” or “-,” and hit the Tab key. The single “=” or “-” will expand into series that matches the length of the text above it. Simple, elegant, useful. But I wanted more.
The problem is, I always find myself changing the text of my headings, which means erasing the underline and redoing it so the line of equals or hyphens matches the length of the new heading text. (Yes, I know that Markdown doesn’t require the length of the underline to match the length of the heading. That’s one of the many niceties John Gruber designed into Markdown. But I’m anal and like my underlines to match.)
Start with this command for <h1> headings.
#!/usr/bin/perl

chomp(@lines = <>);
$under = "=" x length($lines[0]);
print $lines[0] . "\n" . $under . "\n";
unless ($#lines == 0 or $lines[1] =~ /^[-=~]+$/) {
  print $lines[1] . "\n";
}
It takes one or two lines of text as input and prints one, two, or three lines of output. The possibilities are:
- If the input is one line of text, it prints that line and an line of equals underneath it. This handles the case when you’re putting a heading at the end of a document.
- If the input is two lines of text and the second line consists of equals, hyphens, or tildes only, it prints the first input line and a line of equals underneath it. The second input line is consumed. This handles the case when you have rewritten an existing heading.
- If the input is two lines of text and the second line is anything other than a line of equals, hyphens, or tildes, it prints the first line, then a line of equals, then the second input line. This handles every other case.
You can copy and paste this command into the Markdown section of TextMate’s Bundle Editor window. The input should be Selected Text or Nothing, and the output should be Replace Selected Text. The Bundle Editor window should look something like this when you’re done.
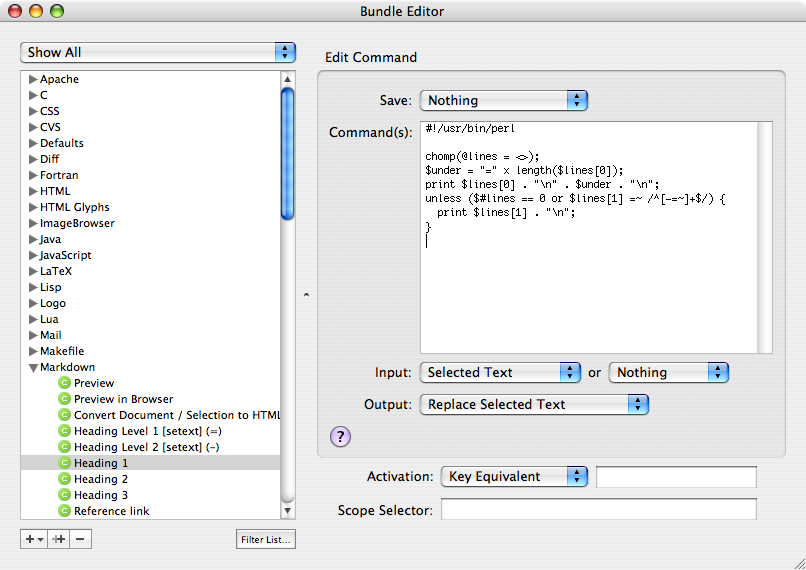
As you can see, I named the command “Heading 1,” but you can call it anything you like. (Click on the screenshot to see it full-sized.)
Now for the macro that prepares the input and runs the command. The idea is to be able to call the macro with the caret anywhere on the line with the heading text, so open a new file and type in a short line of text. Make sure the caret is somewhere in that line. Then
- Choose Start Macro Recording from the Automation menu.
- Type Command-Leftarrow to move the caret to the beginning of the line.
- Type Shift-Downarrow twice to select the heading line and the line below it. (Don’t worry if there is no line below it; the macro will record both keystrokes and the command was written to handle the single-line case.)
- Choose the “Heading 1” (or whatever you called it) command from the popup menu at the gear-like thing at the bottom of the TextMate window. The heading should now be underlined and both lines selected.
- Type Leftarrow followed by two Downarrows to deselect the text and put the caret at the beginning of the line below the underline.
- Choose Stop Macro Recording from the Automation menu.
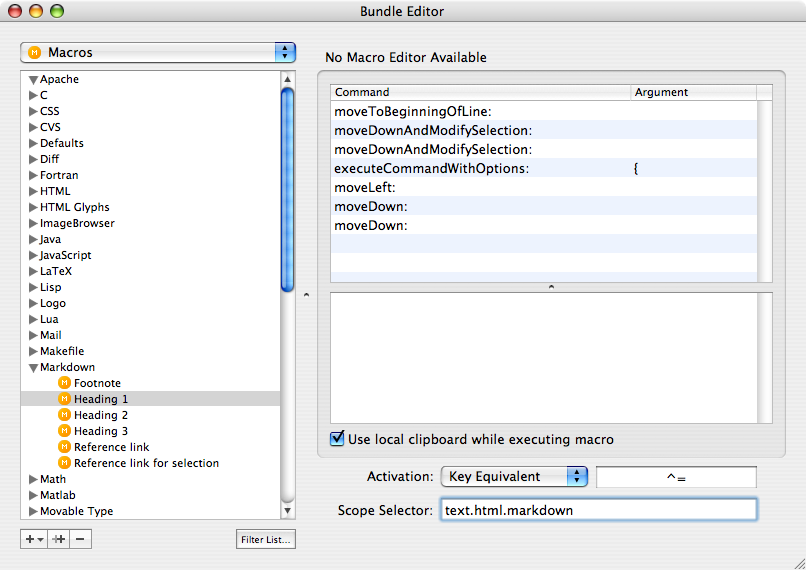
You can now test out the macro under different conditions by choosing Replay Scratch Macro from the Automation menu. If everything works well, choose Save Scratch Macro… from the Automation menu and put it in the Markdown section. Give it a name—I chose “Heading 1” again—a Key Equivalent—I chose Control-=—and set the Scope to “text.html.markdown.” When you’re done, the Bundle Editor window should look like this.
I’ve done the same thing with hyphen underlines by making a copy of the “Heading 1” command, changing the $under = "=" x length($lines[0]); line in the command to under = "-" x length($lines[0]);, and recording a new macro that invokes the new command.
I hope this helps other anal retentives.
Update
In the comments, Clayton Hynfield suggested a change to make the caret always end up below the underline and I’ve incorporated that change in the macro definition. Thanks, Clayton!