
Improved Mac screenshot/upload utility
July 16, 2009 at 5:30 PM by Dr. Drang
I’ve made a couple of improvements to my screenshot/upload utility, snapftp. Snapftp is what I use in place of the Mac’s built-in ⌘⇧4 (Command-Shift-4) screenshot facility. The advantages of snapftp are:
- It allows me to name the screenshot as I take it.
- It can resize the screenshot on the fly.
- It can create both a thumbnail and a full-sized version of the screenshot.
- It can automatically upload the image file(s) to my blog.
- It puts the URL(s) of the uploaded file(s) on my clipboard for later pasting in a blog post.
- It optimizes the images for reduced file size.
Using snapftp
Snapftp has a simple but efficient GUI for setting the file name and size of the screenshot.
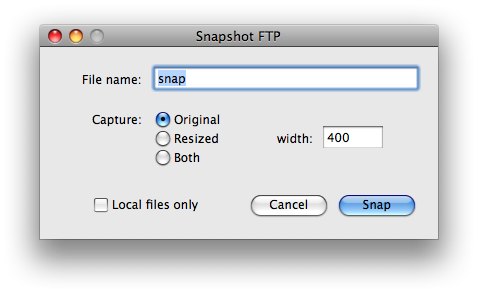
I invoke snapftp through FastScripts using the ⌃⌥⌘4 (Control-Option-Command-4) keyboard shortcut, but it could also be invoked though Quicksilver or LaunchBar. After I set the file name and options and click the Snap button, the snapftp window disappears and the cursor turns into a camera. Putting the camera over any window on the screen and clicking the mouse button takes the screenshot and does whatever resizing and uploading I requested. If I want a screenshot of some arbitrary rectangular area of the screen rather than a window, I push the spacebar to turn the camera cursor into a set of crosshairs and drag out the desired rectangle. (Snapftp’s use of the camera and crosshairs cursor is basically the same as that of ⌘⇧4, only inverted. I made the camera the default because I’m more likely to take screenshots of windows than of arbitrary rectangles.)
The screenshot files appear on my Desktop and, unless I set the “Local files only” option, in the images subdirectory here on my blog. The images are in PNG format; that’s the default for OS X since Tiger (10.4).
Building snapftp
Snapftp is written in Python and uses three command-line utilities that come standard with OS X:
screencapturefor doing the screenshot itself;sipsfor resizing the image; andpbcopyfor putting the URLs on the clipboard.
It also uses two programs that aren’t standard on the Mac:
These have to be downloaded and installed before running snapftp.
Pashua comes in two parts: an application that you put in /Applications, and a Python module, Pashua.py, that you put in /Library/Python/2.5/site-packages. As I said in my earlier snapftp post, I think you should comment out Line 199 of Pashua.py
196:      # Parse result
197:      ResultDict = {}
198:      for Line in Result:
199:          # print Line
200:          Parm, Value = Line.split('=')
201:          ResultDict[Parm] = Value.rstrip()
because a library function that’s intended to read lines shouldn’t be printing anything.
OptiPNG needs to be compiled. Assuming you have the Developer Tools installed, download and extract the tarball and execute
./configure
make
sudo make install
from within the optipng-0.6.3 directory. The optipng binary and man page will be put in /usr/local.
Once Pashua and OptiPNG are installed, you’re ready for snapftp. It consists of this single relatively short Python file:
  1:  #!/usr/bin/python
  2:
  3:  import Pashua
  4:  import sys, os, shutil
  5:  from subprocess import *
  6:  from ftplib import *
  7:
  8:  # FTP and local parameters
  9:  host = "leancrew.com"
 10:  baseurl = "http://www.leancrew.com/all-this/images"
 11:  extension = ".png"
 12:  user = "drdrang"
 13:  passwd = "blahblah"   # no, not my real password
 14:  ftpdir = "public_html/all-this/images"
 15:  localdir = os.environ['HOME'] + "/Desktop"
 16:
 17:  # Dialog box configuration
 18:  conf = '''
 19:  # Window properties
 20:  *.title = Snapshot FTP
 21:
 22:  # File name text field properties
 23:  fn.type = textfield
 24:  fn.default = snap
 25:  fn.width = 264
 26:  fn.x = 94
 27:  fn.y = 130
 28:  fnl.type = text
 29:  fnl.default = File name:
 30:  fnl.x = 20
 31:  fnl.y = 132
 32:
 33:  # Radio button group properties
 34:  rb.type = radiobutton
 35:  rb.option = Original
 36:  rb.option = Resized
 37:  rb.option = Both
 38:  rb.default = Original
 39:  rb.x = 94
 40:  rb.y = 52
 41:  rbl.type = text
 42:  rbl.default = Capture:
 43:  rbl.x = 30
 44:  rbl.y = 92
 45:
 46:  # Resized width text field properties
 47:  rw.type = textfield
 48:  rw.default = 450
 49:  rw.height = 22
 50:  rw.width = 60
 51:  rw.x = 263
 52:  rw.y = 71
 53:  rwl.type = text
 54:  rwl.default = width:
 55:  rwl.width = 50
 56:  rwl.x = 215
 57:  rwl.y = 73
 58:
 59:  # Local files checkbox properties
 60:  lf.type = checkbox
 61:  lf.label = Local files only
 62:  lf.x = 32
 63:  lf.y = 5
 64:
 65:  # Default button
 66:  db.type = defaultbutton
 67:  db.label = Snap
 68:
 69:  # Cancel button
 70:  cb.type = cancelbutton
 71:  '''
 72:
 73:  # Open the dialog box and get the input.
 74:  dialog = Pashua.run(conf)
 75:  if dialog['cb'] == '1':
 76:    sys.exit()
 77:
 78:  # Go to the localdir.
 79:  os.chdir(localdir)
 80:
 81:  # Set the filenames and url.
 82:  fn =  '%s.png' % dialog['fn']
 83:  fnt = '%s-t.png' % dialog['fn']
 84:  url = '%s/%s' % (baseurl, fn)
 85:
 86:  # Capture a portion of the screen and save it to the file.
 87:  Popen(["screencapture", "-iW", fn], stdout=PIPE).communicate()
 88:
 89:  # Resize the file or create a separate thumbnail if requested.
 90:  if dialog['rb'] == 'Resized':
 91:    Popen(['sips', '--resampleWidth', dialog['rw'], fn],
 92:                      stdout=PIPE).communicate()
 93:  elif dialog['rb'] == 'Both':
 94:    shutil.copy(fn, fnt)
 95:    Popen(['sips', '--resampleWidth', dialog['rw'], fnt],
 96:                      stdout=PIPE).communicate()
 97:    # Optimize the thumbnail.
 98:    Popen(['optipng', '-quiet', fnt], stdout=PIPE).communicate()
 99:
100:  # Optimize the main file.
101:  Popen(['optipng', '-quiet', fn], stdout=PIPE).communicate()
102:
103:  # Upload the file(s) and put the URL(s) on the clipboard unless told not to.
104:  if dialog['lf'] != '1':
105:    Popen('pbcopy', stdin=PIPE).communicate('%s/%s' % (baseurl, fn))
106:    ftp = FTP(host, user, passwd)
107:    ftp.cwd(ftpdir)
108:    ftp.storbinary("STOR %s" % fn, open(fn, "rb"))
109:    if dialog['rb'] == 'Both':
110:      ftp.storbinary("STOR %s" % fnt, open(fnt, "rb"))
111:      Popen('pbcopy', stdin=PIPE).communicate('%s/%s' % (baseurl, fnt))
112:    ftp.quit()
Obviously, you’ll need to change the things in Lines 8–15 to fit your situation. You may also want to change the resize default width in Line 48. I use a 450-pixel width because that’s a good match to the content area of this blog.
I won’t repeat the description of the code given in my original post, but I will describe the changes between then and now. The most important change is the addition of image optimization. The images produced by screencapture (Line 87) are a bit bloated. Lines 98 and 101 run the image files through optipng before uploading. These lines change the files in place; the original is overwritten by the optimized version.
The only switch passed to optipng is -quiet to keep it from spitting out progress messages. If you look at the optipng manual, you’ll see that it has many other options, mainly for controlling the optimization. At the moment, I don’t know much about these controls, so I’m just going with the defaults—that may change as I learn more. In my tests so far, the default optimization is reducing file sizes by 20–30%.
The other change from the original snapftp is in its use of the clipboard. Line 105 puts the URL of the uploaded image file onto the clipboard. That was all the original snapftp did. Now, if the user asks for a thumbnail as well (by clicking the “Both” radio button), Line 111 puts the URL for the thumbnail image file onto the clipboard. On most Macs, that would overwrite the first URL, but because I use Jumpcut, I get both URLs in my Clipboard history and can easily paste both of them into my blog posts. I’m pretty sure this will work for anyone using a Clipboard history utility—LaunchBar, iClip, Butler, etc.—but I’ve only tested it with Jumpcut.
Productivity and customization
If you like to edit and annotate your screenshots with comments and arrows and circles and things, you’ll probably be more productive with something like ImageWell. But if you take and upload lots of raw screenshots, snapftp will save you lots of time, especially if you dig into the source code and customize it to your specific needs. For example:
- If you want your screenshots’ default names to include a time and date code, you can use Python’s
datetimemodule to get a timestamp and use that instead of “snap” in Line 24. - If you prefer the default screenshot to be of a rectangular area instead of a window, you can change the
"-iW"option in Line 87 to"-i". - If you’re more concerned with your images’ height than their width, you can change the
"--resampleWidth"options in Lines 91 and 95 to"--resampleHeight". - If you want to restrict the size of the longest dimension, whether width or height, you can change Lines 91 and 95 to use
"--resampleHeightWidthMax". - If you don’t like your Desktop cluttered with screenshot files, you can change Line 15 to put them in some other folder.
These are just the simple customizations that come to mind. If you make your own version of snapftp, I’d like to hear about it.