
Smaller PDFs
September 5, 2009 at 9:20 AM by Dr. Drang
I had always considered ColorSync as one of those things I didn’t need to know much about. I’m not a “graphics professional,” and it’s never been vitally important to me that a particular shade of red is accurately and consistently reproduced on every monitor and printer I use. It turns out, though, that the ColorSync Utility does more than that, and that one of its features is really useful to me.
I wrote a report yesterday that I wanted to get out to the client before the long weekend. In the past, “getting out” a report meant printing it and popping the hard copy in the mail. As my clients have gotten more digitally sophisticated, they’ve come to recognize the value of having a PDF of the report mailed to them. Most of them now even prefer my reports come to them that way. This is great, but since my reports often include several photographs, the PDFs I produce can be huge—tens of megabytes—and will be rejected by many mail servers.
Oddly, this has been made worse by improvements in digital cameras. Time was when my digital photos were 1280×960; now they’re 4416×3312 and take up a few megabytes each.
Zipping the file doesn’t work; the JPEGs embedded in the file are already compressed and refuse to be squeezed further. Splitting the file and sending the pieces in separate emails is a possibility, but I’m always afraid that the person on the receiving end won’t know how to reassemble the pieces. While my clients are certainly better with computers than they were 5–10 years ago, I’ve had enough questions from them on basic matters to know that unsplitting a file is a bit beyond their comfort zone.
The obvious answer is to downsample the photos before inserting them into the report, and I’ve been doing that but not in a very clever or efficient way. A couple of years ago, I created an Automator workflow called Halve that would reduce the resolution by 50% (and the resulting number of pixels by 75%). I would apply Halve to all the photos before inserting them. The lowest-resolution photos were still dense enough to look good when the client printed the PDF or viewed it on her screen, but it left the higher-resolution photos bigger than they needed to be.
Enter ColorSync Utility and its ability to create PDF filters. You may have noticed the Quartz Filter popup menu in the Preview Save As sheet
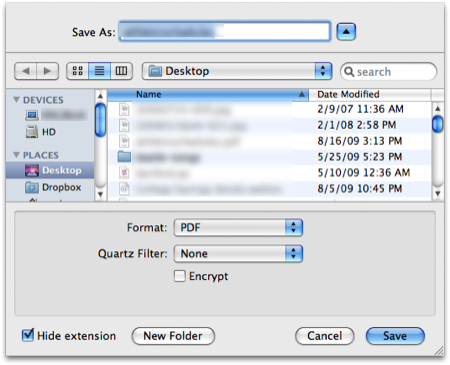
The filters you can apply from that list aren’t magical software devices handed down from the wizards in Cupertino, they’re simple things you can build with a few clicks in ColorSync Utility. There is, by the way, a Reduce File Size filter in that list, but I wanted something better.
I launched ColorSync Utility and went to the Filters pane. Clicking the [+] button at the bottom of the window created a new filter, which I called “150 dpi images.” Now I had a new filter that did nothing. Clicking on the circled triangle to the right of the filter’s name brought up a menu; I chose Color Image Sampling from the Add Image Effects Component submenu and onfigured the filter to downsample the images to a resolution of 150 dpi.
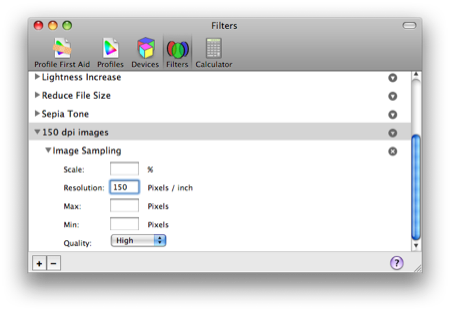
Voila! This filter will reduce the images to a reasonable size while still allowing the PDF to look good when printed or viewed on the screen. The best thing about it is that it by setting an output dpi, every image—regardless of its original resolution or its size within the report—is downsampled to its most efficient density.
Using ColorSync Utility to create PDF filters is not a deep secret, nor is it a new feature. I learned about it from this article written in 2006.