My Finder toolbar
June 17, 2011 at 10:42 PM by Dr. Drang
When I set up my new MacBook Air late last fall, I wanted it to have a better Finder toolbar than the iBook G4 it replaced. The iBook’s Finder toolbar had accreted some utilities that I never used anymore and some that didn’t work too well—they just sat in the toolbar as a testament to my inertia and laziness.
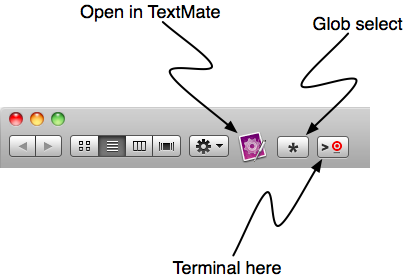
Here’s what I’m using now:

The buttons on the left are just the standard ones provided by Apple. Then come the three I added. All of them were installed by simply dragging an application icon from the Applications folder onto the toolbar.
TextMate
Clicking the TextMate button will launch TextMate if it’s not running, or will switch to it if it is running—neither of which are what I use it for. What I do is drag files from the Finder window and drop them on the button to get them to open in TextMate. This is very handy for text files that don’t have an extension mapped to TextMate already.
Update 6/18/11
On the advice of Allen MacKenzie in the comments, I installed Henrik Nyh’s Open in TextMate script. (How did I miss this when I was on his site downloading the LSelect utility?) Not only does it have a button-like icon that looks better in the toolbar, it also works better than the button you get by simply dragging the TextMate application icon to the toolbar.

Clicking the new button will open the selected file(s) in TextMate. Selecting files and clicking the button can be a bit easier than dragging (although dragging still works), especially on a laptop where it’s easy to “drop” the files before you get to the button.
Even better, if you click the button when no files are selected, all the files in the folder are opened in a TextMate project. Perfect.
LSelect
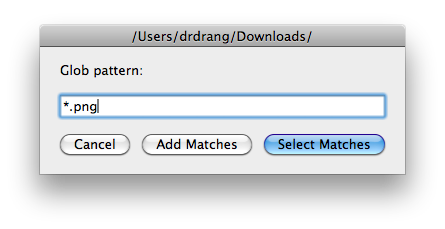
Clicking on the button with the asterisk launches a program called LSelect, written by Jim DeVona. I use a customized version from Henrik Nyh, which provides the nice toolbar button icon.
LSelect is a GUI file globbing utility. Launching it brings up a little window where you enter a filename pattern using the same symbols you’d use in a Terminal window: ? for a single unknown character, * for a run of unknown characters, and [] to enclose a set of possible characters. LSelect (the name is a play on the ls shell command) then selects all the files in the Finder window that match the pattern. It’s a nice way to combine the power of the command line with the direct manipulation of the Finder.

The patterns LSelect uses are simple, just like those in the shell. If you want a full set of Perl regular expressions at your disposal, you should look into Daniel Jalkut’s Select Regular Expression AppleScript. Daniel expects it to be run via FastScripts, but I suspect you could turn it into an application and add it to the Finder toolbar if you wanted to.
I prefer to stick with the simpler shell globbing patterns, mainly because I do a lot of work in the Terminal and I like the idea of using the same patterns in both places.
ShellHere
And speaking of the Terminal, clicking last button launches ShellHere, an application by John Daniel that opens a Terminal window with the current working directory set to the directory shown in the Finder window. It’s an improvement on Marc Liyange’s venerable Open Terminal Here script, which has always had the unfortunate tendency to open more than one Terminal window when invoked.
The idea of ShellHere is to avoid having to cd through multiple directories just to get to a folder level that’s already showing in the Finder. It gives normal Finder users the same quick access to the shell that Visor and PathFinder users take for granted.
My ulterior motive
My iMac at work is also getting a little long in the tooth and has accumulated a few Finder toolbar buttons I no longer use. Since I seldom have the MB Air with me at the office, I can never remember which applications will give me the buttons I want. My main purpose in writing this was to give myself a reminder of what to install at work.
If it helps you out, that’s nice, too.

