Screenshot/upload utility - now with Flickr
July 8, 2011 at 9:06 AM by Dr. Drang
I wrote a little utility called snapftp a few years ago to streamline my writing of posts about software. These posts typically include a snapshot or two of the software, and the purpose of snapftp was to take the multistep process of
- taking the screenshot,
- resizing it to fit in the blog, if necessary,
- uploading it to the server, and
- putting the URL of the uploaded image onto the clipboard for linking
and make it about as simple as the built-in screenshot utility bound to ⇧⌘4.1
Snapftp still works fine, but I’ve been thinking recently that most of the images I use here should be served from Flickr rather than the blog’s shared hosting server—this should help stave off any future Fireballings. I do, after all, have a Flickr Pro account and might as well take advantage of it.
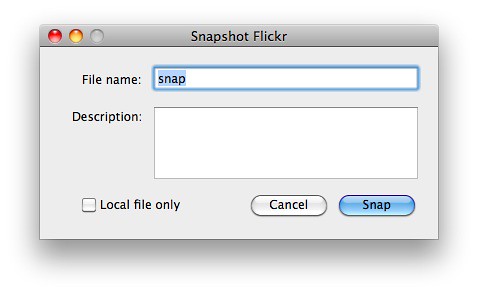
So I wrote a new script, called snapflickr, which I use more or less the same way I used snapftp: I launch it via FastScripts through the ⌃⌥⌘4 key combination, and it puts up this dialog box:
I fill in the file name and, optionally, a description. If I don’t want the image uploaded to Flickr, I click the “Local file only” checkbox (this is typically for images I want to edit or annotate before uploading). When I click the Snap button, the dialog disappears and the cursor turns into a camera. I put it over the window I want a snapshot of and click. The image is saved to my Desktop and uploaded to Flickr. A URL for the uploaded image (about which more later) is put in the clipboard, and the Flickr page for the image appears in my default browser.2
As with the built-in ⇧⌘4 screenshot utility, I can switch between taking snapshots of windows and snapshots of rectangular areas by pressing the spacebar after clicking the Snap button.
Here’s the source code for snapflickr. It uses two third-party libraries: Carsten Blum’s Pashua, which is both an application and a library, and Sybren Stüvel’s FlickrAPI. The other libraries snapflickr uses are included in the standard Python distribution.
python:
  1:  #!/usr/bin/python
  2:
  3:  import Pashua
  4:  from flickrapi import FlickrAPI
  5:  import sys, os
  6:  from subprocess import *
  7:  import re
  8:
  9:  # Local parameters
 10:  extension = "jpg"
 11:  localdir = os.environ['HOME'] + "/Desktop"
 12:
 13:  # Flickr parameters
 14:  fuser = 'drdrang'
 15:  key = 'Get key from Flickr'
 16:  secret = 'Get secret from Flickr'
 17:  token = 'Run another script to get token'
 18:
 19:  # Dialog box configuration
 20:  conf = '''
 21:  # Window properties
 22:  *.title = Snapshot Flickr
 23:
 24:  # File name text field properties
 25:  fn.type = textfield
 26:  fn.default = snap
 27:  fn.width = 264
 28:  fn.x = 94
 29:  fn.y = 130
 30:  fnl.type = text
 31:  fnl.default = File name:
 32:  fnl.x = 20
 33:  fnl.y = 132
 34:
 35:  # Description text field properties
 36:  desc.type = textbox
 37:  desc.width = 264
 38:  desc.height = 72
 39:  desc.x = 94
 40:  desc.y = 40
 41:  descl.type = text
 42:  descl.default = Description:
 43:  descl.x = 10
 44:  descl.y = 95
 45:
 46:
 47:  # Local files checkbox properties
 48:  lf.type = checkbox
 49:  lf.label = Local file only
 50:  lf.x = 20
 51:  lf.y = 5
 52:
 53:  # Default button
 54:  db.type = defaultbutton
 55:  db.label = Snap
 56:
 57:  # Cancel button
 58:  cb.type = cancelbutton
 59:  '''
 60:
 61:  # Open the dialog box and get the input.
 62:  dialog = Pashua.run(conf)
 63:  if dialog['cb'] == '1':
 64:    sys.exit()
 65:
 66:  # Go to the localdir.
 67:  os.chdir(localdir)
 68:
 69:  # Set the filename.
 70:  fn =  '%s.%s' % (dialog['fn'], extension)
 71:
 72:  # Capture a portion of the screen and save it to a file.
 73:  Popen(["screencapture", "-iW", "-t", extension, fn], stdout=PIPE).communicate()
 74:
 75:
 76:  # Unless this is just a local file...
 77:  if dialog['lf'] != '1':
 78:
 79:    # Upload the file.
 80:    flickr = FlickrAPI(api_key=key, secret=secret,\
 81:              token=token, store_token=False)
 82:    response = flickr.upload(filename=fn, title=dialog['fn'],\
 83:                description=dialog['desc'], is_public=1,\
 84:                tags='screenshot 2011', format='etree')
 85:
 86:    # Get the photo info from Flickr.
 87:    photoID = response.find('photoid').text
 88:    photoURL = 'http://www.flickr.com/photos/%s/%s/' % (fuser, photoID)
 89:    etree = flickr.photos_getSizes(photo_id = photoID, format = 'etree')
 90:    for i in etree[0]:
 91:      if i.attrib['label'] == 'Original':
 92:        original = i.attrib
 93:      if i.attrib['label'] == 'Medium':
 94:        medium500 = i.attrib
 95:
 96:    # Use the original if it's no more than 500 pixels wide,
 97:    # otherwise use the medium size.
 98:    if int(original['width']) <= 500:
 99:      imageURL = original['source']
100:    else:
101:      imageURL = medium500['source']
102:
103:    # Copy the URL to the clipboard.
104:    Popen('pbcopy', stdin=PIPE).communicate(imageURL)
105:
106:    # Open the photo page in the default browser.
107:    Popen(['open', photoURL]).communicate()
Flickr requires programmers to register their applications before using its API. It’s a simple process, and at the end you’re given a key and a secret that are parts of the authentication process. Snapflickr stores my key and secret on Lines 15 and 16. The last part of the authentication process, the token, is stored on Line 17. Getting the token is an interactive bit of business that we’ll look at later.
The biggest section of the script, Lines 19-64, is the definition of the dialog box and the call to Pashua to display it and get the input. As I’ve discussed this in a previous post, I won’t repeat the description here. Suffice it to say that if I had to write this kind of fiddly UI code often, I’d be looking for a way to use Interface Builder instead.
The snapshot itself is taken in Line 73 by calling the screencapture utility. The -i option makes it work interactively; the -W option puts it in “window selection” mode initially (which, as I said, can be changed to “mouse selection” mode by pressing the spacebar); and the -t jpg option does exactly what you think: it saves the screenshot as a JPEG.
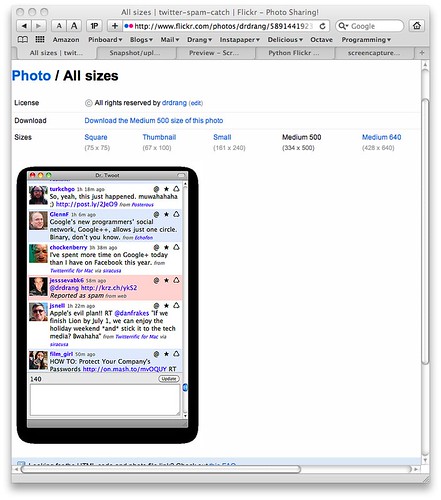
I used to save my screenshots as PNGs to get pixel-perfect representations, but I’ve learned that Flickr is better suited to JPEGs. The problem is the transparency in the window shadow. Flickr handles that well in the Original version of an uploaded PNG, but in all the other sizes, the transparency is lost and the shadow turns into an ugly black frame around the image. That doesn’t happen with JPEGs.3
Lines 79-107 handle the interaction with Flickr.
- Lines 80-81 establish the connection with the API using the credentials given near the top of the script.
- Lines 82-84 do the uploading and get back the Flickr ID of the uploaded image.
- Lines 87 and 88 use the ID to construct the URL to the Flickr page for the image.
- Lines 89-94 grab the information about the Original and Medium sizes of the image, and Lines 98-101 determine which image URL will be put on the clipboard. If the Original image is wider than 500 pixels, I use the Medium size because that fits well in the content area of the blog.
- Line 104 calls the
pbcopyutility to put the image URL on the clipboard. - Line 107 calls the ever-useful
openutility to open the image’s Flickr page in my default browser. Currently, this is Safari, but if I ever change to Chrome,openis smart enough know that and use Chrome instead.
The hardest part was the stuff in Lines 86-101, mainly because it involved the confluence of three libraries I’d never used before: the Python FlickrAPI library, the Flickr API itself, and the Python ElementTree library, which FlickrAPI uses to return results. I often found myself searching for help only to realize that I was looking in the wrong documentation.
Let’s talk about the authentication token. Flickr requires the user of a program to give permission for that program to access the account. When the user gives permission, Flickr provides a token that the program must then include to authenticate subsequent calls to the API. Fortunately, I don’t have to go through this permission dance every time I want to use snapflickr. I only had to get the token once—using a completely different script—and save it on Line 17.
The script I used to get the token is the Authentication script found in the documentation of Maël Clérambault’s Ruby flickraw library. Why did I use a Ruby script when I don’t really know Ruby? Well, the documentation for the Python FlickrAPI library didn’t have very many code examples, and before I did any coding I wondered if maybe Python wasn’t the right tool for this job. The Ruby library seemed much more inviting, so I began playing around with it. One of the scripts I tried was this Authentication example:
ruby:
 1:  require 'flickraw'
 2:
 3:    FlickRaw.api_key="... Your API key ..."
 4:    FlickRaw.shared_secret="... Your shared secret ..."
 5:
 6:    frob = flickr.auth.getFrob
 7:    auth_url = FlickRaw.auth_url :frob => frob, :perms => 'read'
 8:
 9:    puts "Open this url in your process to complete the authication process : #{auth_url}"
10:    puts "Press Enter when you are finished."
11:    STDIN.getc
12:
13:    begin
14:      auth = flickr.auth.getToken :frob => frob
15:      login = flickr.test.login
16:      puts "You are now authenticated as #{login.username} with token #{auth.token}"
17:    rescue FlickRaw::FailedResponse => e
18:      puts "Authentication failed : #{e.msg}"
19:    end
I put in my key and secret in Lines 3 and 4 and got a token when I ran it. When I eventually decided to use Python anyway,4 there seemed no good reason to let that token go to waste, so I copied it from the Terminal into snapflickr. You may call this lazy; I prefer to think of it as supremely efficient.
Now that I have a little experience with the FlickrAPI library, I’ll probably rewrite my Flickr URL TextExpander snippet to use it instead of the convoluted (and fragile) screenscraping logic it currently uses.
-
Do I need to point out that this is Mac-specific? ↩
-
If the “Local file only” box is checked, none of the Flickr-related actions are performed. ↩
-
You may be wondering why I don’t use the
-ooption toscreencaptureto eliminate the shadow. The problem is that-oalso eliminates the thin black line around the window border, which makes the screenshots look wrong. Try it and see. ↩ -
There are two parts to the
snapflickr: the user-facing Pashua interface and the backend Flickr interface. Ruby seemed easier for the backend work, but that was going to be the distinctly smaller part of the script. Because I’d already used the Python interface to Pashua onsnapftpand had a few dozen lines of code that just needed a little editing, Python won. ↩


