Broken bracket
March 15, 2012 at 10:25 PM by Dr. Drang
With the beautiful weather here in Chicagoland, I’ve been able to get off to a fast start with this year’s bike commuting. I’ve ridden 120 miles at the halfway point of the month. Last year I had only 85 miles at the end of March, and the year before it was 144 miles for March. I know this because I keep track of my mileage every year in a Google spreadsheet.
This is not a Stephen Wolfram level of personal data collection, but it’s nice to have. I could just keep it in a regular spreadsheet saved locally on my computer, but this way I can embed a live version here and it will update as the season progresses.
The only column I update is Cumulative. It gets the value of my odometer, which I reset to zero at the beginning of the year. All the other columns are calculations or fixed values. I don’t need to update the spreadsheet every day or even every week; the only days I need to update are the last days of each month. So the requirements for me to keep current are pretty minimal.
My first ride was the morning of March 1. After crossing an intersection and hopping a low curb, I heard a metallic clattering behind me. I winced as I stopped and turned around, fearing some nasty damage to my bike. Luckily, it was just my lock; the bracket holding it to the seat post had broken. I gathered up the pieces, threw them in a pannier, and finished the ride.
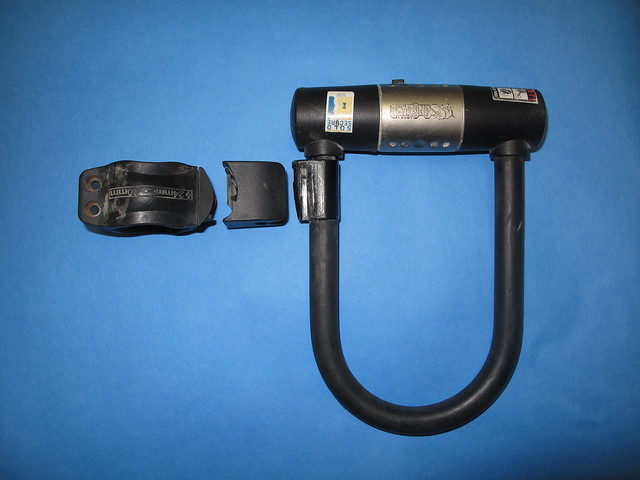
A normal person would just get a new bracket, or a new lock with a new bracket, and get on with his life. I had to investigate the failure. Here are the pieces of the bracket and the lock.
The tab on the left side of the lock slides into a slot in the bracket. The bracket started life as two plastic parts screwed together. One was the part with the slot—that’s the part that broke—and the other clamped around the seat post.
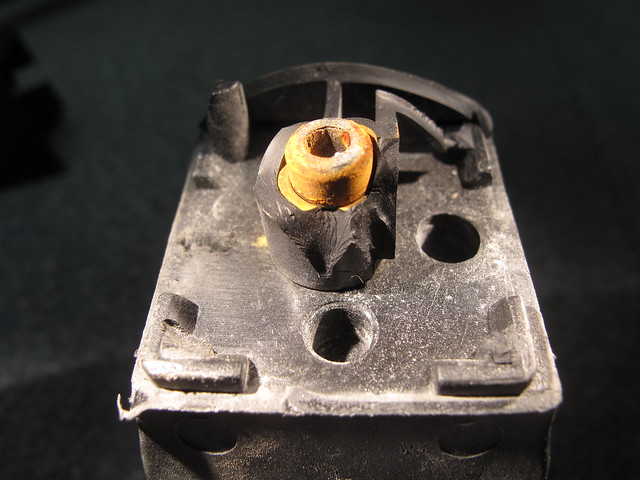
The bigger piece of the slotted part fell to the pavement along with the lock; the smaller piece stayed on the seat post, still screwed to the clamp part. Here’s the smaller broken piece, the screw, and the clamp part.
Do you see the triangular fan of ridges on the fracture surface? It’s at the center of the photo, just below the rusty orange head of the screw. The bottom vertex of the triangle, the point from which all the ridges radiate, is the origin of the fracture. That’s where everything started.
From there, the fracture swept around the circular reinforcement that surrounds the screw and ran out the straight reinforcing plates connected to the circle.
Finally, the crack radiated out from the T intersection at the center of the above photo and broke out through the side plate of the slotted part. The side plate is the horizontal plate in the above photo. The fracture here is the broken arc you see in the first photo.
The faint curved lines you see on side plate’s fracture surface (you may need to click on the photo to go to a larger view on Flickr) are Wallner lines, which arise from the interaction of reflected stress waves with the advancing crack front in a moving crack.
The cracking didn’t occur all at once when I hopped the curb. There are a few places where it appears that the crack arrested and stayed the same size for a while. Unfortunately for me, the cracking started inside the part, so I couldn’t see how bad it was until it finally broke through.
The lock itself is in great shape, so I called the manufacturer and ordered a replacement bracket. Until it comes, the lock will stay in the bottom of one of my panniers.
Despite it failing, I can’t complain about the strength of the bracket. I’m pretty sure I bought that lock (with bracket) back in the late ’90s, so I got my money’s worth out of it. If the replacement bracket lasts even half as long, I’ll be satisfied.
Here’s your reward for making it to the end of this post. Thanks to Twitter friend Ricky Mondello (@rmondello) for linking to it.
I am occasionally a pale imitation of the second guy.
Update 3/17/12
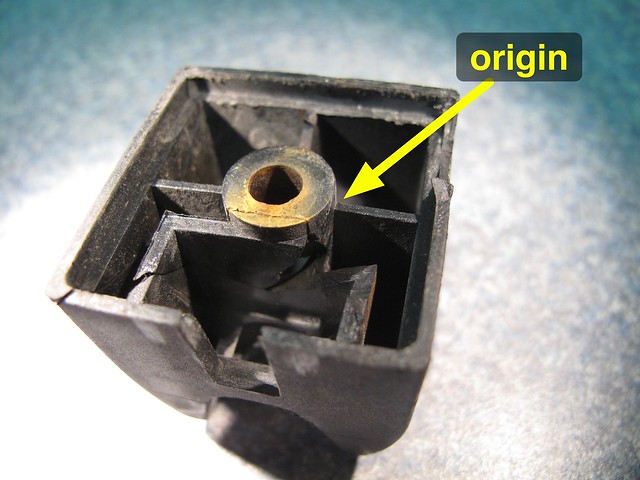
Jamie in the comments asked what improvements could be made in the bracket’s design. I was going to offer some weak answer about thickening the reinforcing ribs and, if possible, rounding the corners where they meet. I then realized that I didn’t do a particularly good job of explaining that the the origin of the fracture was at a sharp corner where one of the ribs met the boss around the screw hole.
Here’s a photo that shows the geometry a little better. I removed the screw, detached the smaller portion of the broken slotted part from the clamp part, and put the two broken pieces of the slotted part back together.
If you’re having trouble visualizing how this is the same origin shown in the earlier photo, it’s probably because the smaller portion of the broken part has been flipped. The fracture surfaces that were facing up in the earlier photos are now facing down.
Anyway, you can see how sharp that corner is. Corners like that act as stress concentrators, raising the stress at the corner by factors of perhaps two or three, depending on the nature of the loading and the sharpness of the corner. It’s very common for failures to start at a corner like this, which is why every design text will tell you to put a generous radius in there if you can.
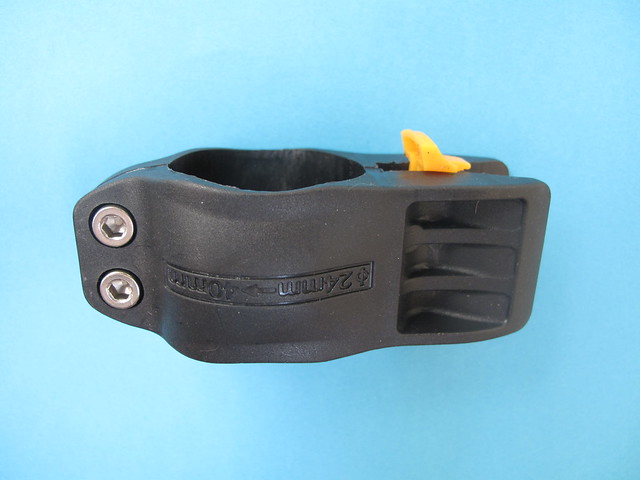
As I say, I was going to answer Jamie that way, but before I got around to it, the replacement bracket came in the mail. It’s of a later design than my original, and the manufacturer went much further in improving the design than my suggestion.
The new bracket is, apart from the yellow locking tab (which my bracket had but which was lost when the bracket broke), one single molded piece, not two molded pieces screwed together. Without that screw hole, there’s no need for internal reinforcing ribs and no sharp corners leading to stress concentrations.
Further, instead of saving material by having a hollow piece with internal reinforcement, here material is saved by dishing out areas from the exterior and reinforcing those areas with thick ribs. The whole design is less likely to crack, and if it does crack, the cracks will be on the outside where they can be seen.
Why wasn’t the bracket a one-piece design in the first place? Good question. Maybe there was a desire initially to have a modular design with replaceable parts. Maybe they just couldn’t figure out a way to mold it in one piece until they had some experience under their belts. Engineering design is very much a empirical, iterative art.
And now that the update is nearly as long as the original post, I might as well answer Sp’s question. No, Sp, the rust on the screw was only surficial and didn’t influence the failure. While it is true that the expansion of steel as it corrodes can be a big problem—especially in reinforced concrete, where corroding rebar can expand so much that it pops the surrounding concrete apart—that didn’t happen here. That would only happen if the screw fit very tightly in its hole (it didn’t) and led to the boss splitting (it didn’t).


