Photos, CoverFlow, QuickLook, and Spotlight
February 9, 2008 at 11:22 PM by Dr. Drang
I take a lot of photos for work. I organize the photo files according to project and the date on which they were taken. For example, the photos I take on April 23, 2007 on the Smith Industries project will be kept in the folder /Users/drang/projects/smith.industries/Photos/20070423.1 I don’t use iPhoto, because:
- I don’t like having all my photos lumped together, which is iPhoto’s default behavior.
- Setting up an iPhoto library for each project is a hassle, as is telling iPhoto which library to use.
- I often need to burn all the photos for a particular project onto a CD or DVD and send them to a client. This is much more convenient when all the photos are in a single directory.
I used to use a combination of the Finder and Xee to review photos, and I outlined my system here and here. Basically, I’d use the Finder’s Icon View with 128 pixel icons to quickly scroll through a folder of photos (I wrote an AppleScript to toggle between the large icon size and the 48 pixel size I usually use), and I’d use Xee for more detailed viewing. This worked well, but with Leopard there’s a better way.
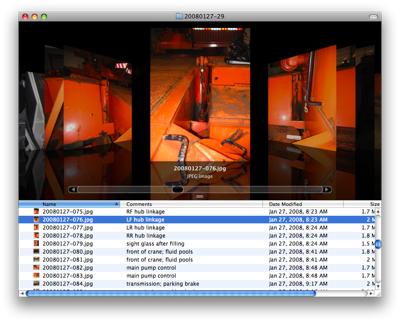
First, I can use CoverFlow in the Finder to scroll through a folder of photos, and I get to see them at a much larger size than in Icon View.
Often, this view is good enough for my purposes. If I need to see a picture at a larger size, a quick press of the spacebar brings it up at a larger size in QuickLook. Option-clicking in the QuickLook window will zoom in further, if necessary. Although it’s a fine program that’s served me well, Xee now seems unnecessary.
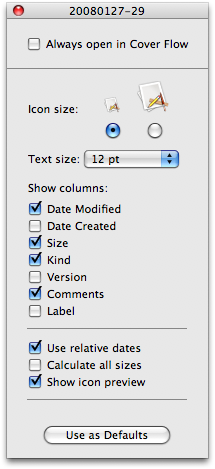
I’m trying to make better use of Spotlight with my photos, too. You’ll notice in the screenshot above that the file list below the CoverFlow area has a Comments field just after the Name field. I’m using this as a way of captioning the photos. The captions are easy to read as I flip through the photos, and I can use Spotlight to show just those photos that have a keyword in their comment. Comments aren’t visible by default; you have to select Show View Options from the View menu at click the Comments checkbox.

Once the Comments are visible, you can reorder and resize the columns.
The normal way of adding Spotlight comments to a file is to open the file’s Info window and typing in the little Spotlight Comments box. This is a lot of busywork if you have dozens or hundreds of photos to caption. So I wrote an AppleScript that looks for a file called “captions.txt” in the same folder as the photos and sets the comments according to the contents of that file. You can write “captions.txt” in your favorite text editor, making use of whatever shortcuts and timesavers it provides.
The “captions.txt” file is a plain text file with the following format:
20080127-073.jpg|passenger area
20080127-074.jpg|LF hub linkage
20080127-075.jpg|RF hub linkage
20080127-076.jpg|LF hub linkage
20080127-077.jpg|LR hub linkage
20080127-078.jpg|RR hub linkage
20080127-079.jpg|sight glass after filling
20080127-080.jpg|front of crane; fluid pools
20080127-081.jpg|front of crane; fluid pools
Each line represents a single file. The name of the photo file and its caption are separated by the vertical pipe character (which I chose because I don’t expect it to ever show up in my file names or captions).
Here’s a hint for automatically generating all the photo file names: open Terminal, cd to the photo folder, and run this command:
ls *.jpg | pbcopy
The ls lists all the files that end with “.jpg”, and the pbcopy puts that list onto the Clipboard. Now you can Paste in your text editor, and the files will appear, one per line. You may need to change the *.jpg to *.JPG if that’s how your files are named.
The AppleScript that processes the captions, cleverly entitled “Caption photos,” looks like this:
 1:  tell application "Finder"
 2:    set photoFolder to target of front Finder window as alias
 3:    set cFiles to files of photoFolder whose name is "captions.txt"
 4:    if (count of cFiles) = 0 then
 5:      return -- stop if there's no captions file
 6:    end if
 7:
 8:    display dialog "Do you want to append or replace existing comments?" buttons ["Append", "Replace"] default button 2
 9:    set dialogResult to result
10:    set cFile to item 1 of cFiles as alias
11:    set capLines to read cFile as text using delimiter "
12:  "
13:    set savedTextItemDelimiters to AppleScript's text item delimiters
14:    set AppleScript's text item delimiters to {"|"}
15:    repeat with theLine in capLines
16:      set fileName to text item 1 of theLine
17:      set fileComment to text item 2 of theLine
18:      if button returned of dialogResult is "Append" then
19:        set oldComment to comment of file fileName in folder photoFolder
20:        set comment of file fileName in folder photoFolder to (oldComment & return & fileComment)
21:      else
22:        set comment of file fileName in folder photoFolder to fileComment
23:      end if
24:    end repeat
25:    set AppleScript's text item delimiters to savedTextItemDelimiters
26:
27:  end tell
It’s meant to be run when the folder of photos is open and is the frontmost Finder window. If there’s no “captions.txt” file in the folder, nothing happens. If there is a “captions.txt” file, the script asks (in Line 8) if you want the captions in the file to be appended to or replace any existing comments. Replace is the default. The append or replace question is not asked for each individual file, because I can’t imagine the need for that.
I just started using Spotlight comments for photo captions. There may be some downside to it that I haven’t discovered yet, but so far it seems very useful.
-
I got into the habit of capitalizing the
Photosfolder back in my Linux days. The Linux file managers I used sorted contents in ASCII order, so items with initial capital letters always came first. MyPhotosfolder was therefore always near the top of the project folder’s contents list—easy to find and open. The Mac’s “Arrange by Name” scheme is not case sensitive, so there’s no point in capitalizing anymore. I just haven’t dropped the habit yet. ↩

