
iPhone stand
October 25, 2010 at 8:00 AM by Dr. Drang
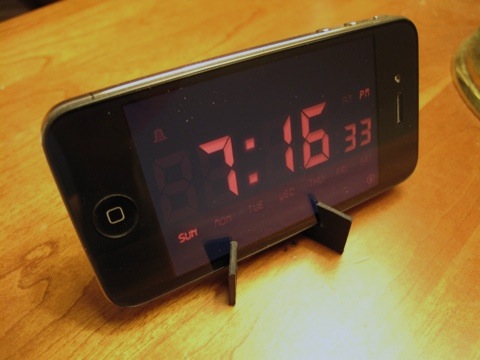
My older son has started using his iPhone as a nightstand alarm clock by plugging it in and running the modestly named Best Alarm Clock app overnight. He’s using some cobbled-together set of props to keep the phone upright, and I wanted to make him something a little nicer. And I wanted something similar for myself—not just for my nightstand at home but to use when traveling.
There is, as you probably heard, the Glif, which looks really cool but (a) isn’t available yet, and (b) would be a shame to lose. I have a strong sense that any little stand I carry with me on trips is going to get lost, so I wanted something cheap and easily reproducible.
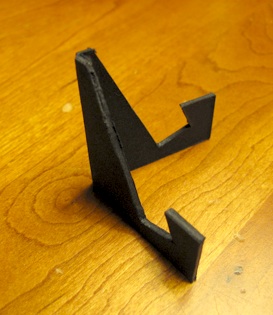
What I came up with is this: a small piece of black matte board, cut, scored, and folded to fit an iPhone slipped into the slots in its legs.
To get a good fit, I worked out the necessary geometry for the back and the legs in a plane perpendicular to the phone. The cross-section of the phone has to fit into the projection of the legs onto this plane.
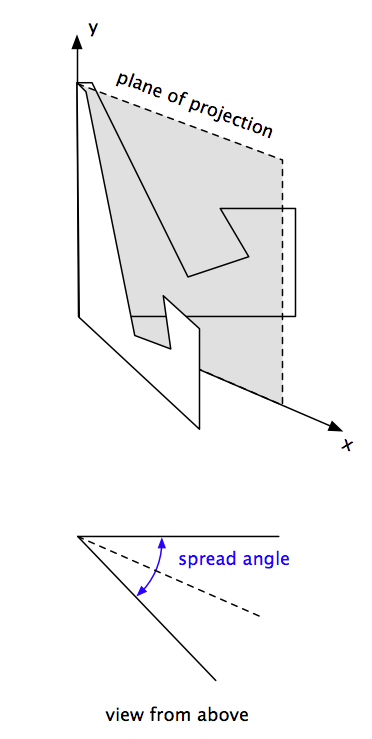
With the geometry in the x-y plane of projection set, I work out the dimensions of the legs themselves by dividing the x-coordinates by the cosine of half the spread angle.
Just working out the geometry wasn’t good enough. What I really wanted was a way to print out the shape so I could transfer it to the matte board and cut it out. Also, because I wasn’t sure what tilt angle and spread angle would work the best, I wanted to be able to quickly experiment with different designs. So I wrote this little script in Python, which generates a PDF of the stand based on a few geometric properties. I call it phonestand.
 1:  #!/usr/bin/python
 2:
 3:  from __future__ import division
 4:  from math import cos, sin, tan, radians
 5:  from sys import stdout
 6:  from reportlab.lib.pagesizes import letter
 7:  from reportlab.pdfgen import canvas
 8:
 9:  # Input geometry factors.
10:  height = 1.75           # inches  - height of back spine
11:  thickness = 0.375       # inches  - thickness of phone
12:  tilt = 20               # degrees - tilt angle of phone from vertical
13:  spread = 75             # degrees - spread angle of legs
14:
15:  # Fixed geometry factors.
16:  clearance = 0.25        # inches  - bottom and edge clearances
17:  tip = 0.125             # inches  - width at tip of back spine
18:
19:  # Calculated geometry factors
20:  tilt = radians(tilt)
21:  scale = 1.0/cos(radians(spread/2.0))
22:
23:  coords = []
24:
25:  # Coordinates of half the stand in projected plane.
26:  coords.append((0.0, height))
27:  coords.append((tip, height))
28:  coords.append((coords[-1][0]+(height-0.25)*tan(tilt), clearance))
29:  coords.append((coords[-1][0]+thickness*cos(tilt), coords[-1][1]+thickness*sin(tilt)))
30:  coords.append((coords[-1][0]-thickness*sin(tilt), coords[-1][1]+thickness*cos(tilt)))
31:  coords.append((coords[-2][0]+clearance, coords[-1][1]))
32:  coords.append((coords[-1][0], 0.0))
33:  coords.append((0.0, 0.0))
34:
35:  # Coordinates of half the stand in its own plane.
36:  coords = [  (x*scale, y) for (x, y) in coords ]
37:
38:  # Mirror image for other half of stand.
39:  mirror = coords[:-1]
40:  mirror.reverse()
41:  mirror = [ (-x, y) for (x, y) in mirror ]
42:
43:  # All together.
44:  coords = coords + mirror
45:
46:  # Convert from inches to points.
47:  coords = [ (x*72, y*72) for (x, y) in coords ]
48:
49:  # The ends of what will be the fold line.
50:  top = coords[0]
51:  bottom = coords[7]
52:
53:  # Now that we have the coordinates, we'll draw the stand.
54:  c = canvas.Canvas(stdout, pagesize=letter)
55:
56:  # Centered left/right and 0.75 inches from top.
57:  c.translate(letter[0]/2, letter[1] - top[1] - 0.75*72)
58:
59:  # The outline.
60:  c.setLineWidth(2)
61:  p = c.beginPath()
62:  p.moveTo(*coords[0])
63:  for pt in coords[1:]:
64:    p.lineTo(*pt)
65:  c.drawPath(p)
66:
67:  # The fold line.
68:  c.setDash(8, 4)
69:  c.setLineWidth(1)
70:  f = c.beginPath()
71:  f.moveTo(*top)
72:  f.lineTo(*bottom)
73:  c.drawPath(f)
74:
75:  # Finish up.
76:  c.showPage()
77:  c.save()
It uses the third-party ReportLab Toolkit to create the PDF. If you’re interested in playing around with phonestand, you’ll have to download the free ReportLab library and install it. No big deal; once you’ve downloaded and expanded the zipfile, it’s just python setup.py install.
The geometric factors I wanted to experiment with are given in Lines 10-13: the height of the back “spine,” the thickness of the phone, the tilt angle of the phone, and the spread angle of the legs. You might think the thickness of the phone is fixed, but I wanted to be able to handle phones in cases, too. The 0.375″ dimension shown in Line 11 works for a “naked” iPhone 4.
With a height of 1.75″, the spine runs about two-thirds of the way up the width of the phone. I wouldn’t go much shorter than about 1.5″. A tilt angle of 20° works well. I tried 30° initially and found it to be too much. The spread angle of 75° is probably a bit small; the next one I do will have a spread angle of 90°.
Lines 26-33 calculate the (x, y) coordinates of all the corner points in the plane of projection. Line 36 then scales the x-coordinate according to the spread angle. These are the hard parts; the rest of the coordinate calculation is just mirroring to get the second leg and converting from inches to PostScript points.
The PDF creation starts on Line 54. The drawing methods in the ReportLab library are a close match to the drawing commands in PostScript and are pretty easy to follow. The only tricky thing is that the drawing methods themselves don’t put any ink on the page; as in PostScript, you need to remember to add a showPage after doing the drawing.
I didn’t want an output filename hard-wired into the script, so the PDF file is sent to standard output. To generate the file, you make phonestand executable, put it in your $PATH, and run
phonestand > stand.pdf
from the command line. Choose whatever filename you like, of course. What you’ll get is a single-page PDF that looks like this:
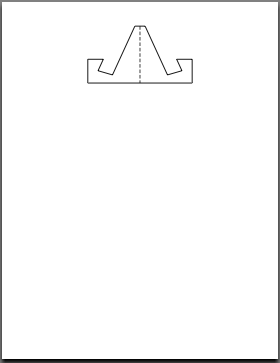
The solid lines are for cutting through; the dashed line is for scoring. I tape the drawing down onto the matte board and poke holes with a pin at each corner and near the top and bottom of the vertical score line. Then I connect the holes using an X-Acto knife and a straightedge. I’ve found that the scoring needs to be pretty deep, especially near the top of the spine, to get the legs to fold easily without delaminating the matte board.
I bought my matte for a few bucks at an art supply store, and it’ll yield dozens of stands. Even I couldn’t lose that many.
Update 11/1/10
If you have an iPhone 4 in the Apple bumper, a thickness of 0.450″ should work.