VNCing to work
November 29, 2014 at 4:19 PM by Dr. Drang
When I’m working on my MacBook Air at home or on the road, and I need to get at files on my office computer—files that aren’t already synced to the Air via Dropbox—I use Transmit to get at them through SFTP. And when I need to run command-line programs on the office machine when I’m working remotely, I SSH into it and type the commands directly into the Terminal. But sometimes there’s no substitute for being able to control the office computer with a mouse or trackpad. In those situations, I run Screen Sharing, which is OS X’s program for VNC, the Virtual Network Computing protocol.
I’ve written about this on at least two previous occasions, but I don’t have a single post with the scripts and macros I use now. I recently had to rewrite a couple of things because my IP number changed at work, so it seemed like a good time to put everything in one package.
I’ve never felt comfortable using Screen Sharing by itself, because I don’t know what kind of encryption Apple uses. I’ve read that VNC itself isn’t secure, so something else needs to be done. Back in my Linux days, I used SSH tunneling to share X Windows screens between computers, and I’ve continued that habit on OS X even though I realize it may be unnecessary. If I lose a little responsiveness because of redundant encryption, so be it.
SSH tunneling is a technique in which you run unencrypted communications, like VNC, through an encrypted SSH connection. The ssh command line tool has options for setting up this kind of tunnel.
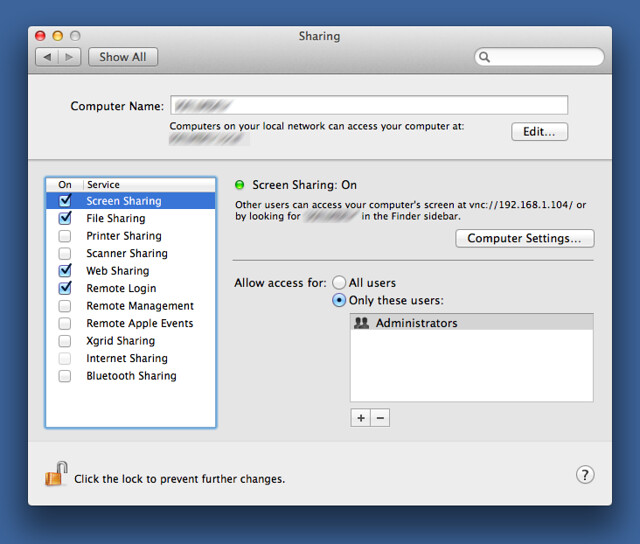
First, let’s see how my iMac at work is configured. In the Sharing Setup preference pane, I allow both Remote Login, which is what opens up SSH and SFTP access, and Screen Sharing, which opens up VNC.
Getting outside SSH traffic into the office computer is going to be a little different for everyone. The router at my office is configured to forward traffic on the SSH port to my iMac. Your situation may be different.
By default, the SSH port is number 22, but you can change that to any number you like. In the scripts that follow, I’ll be using dummy values for certain IP and port numbers. If you want to adapt them for your situation, you’ll have to edit those numbers to match your setup.
Let’s start with a script that runs on my MacBook Air, called workscreen.
bash:
1:  #!/bin/bash
2:
3:  ssh -L 6900:localhost:5900 -N -p 9922 drang@1.2.3.4 &
4:  tunnelPID=$!
5:  sleep 3
6:  open -W vnc://localhost:6900
7:  kill $tunnelPID
Line 3 establishes the tunnel. The -L option binds port 6900 (arbitrarily chosen) on the local machine (localhost) to port 5900 (the VNC port) on the remote computer. The -N option tells it not to run any commands. The -p option tells it which port to use for SSH (which has to be coordinated with the office computer and the office router). The user name and IP number of the office computer come last. Normally, this command would not return control to the script until it was killed, but the & at the end of the line forks the process and allows the script to continue.
Line 4 uses the special $! variable to store the process ID of the ssh command into a variable that we’ll use later. Line 5 pauses for an arbitrary 3 seconds to make sure the SSH tunnel is established before proceeding.
Line 6 uses the OS X open command to start the VNC connection with port 6900 on the local machine. By default, the vnc:// protocol is tied to the Screen Sharing application, so unless you’ve changed that, this line will launch Screen Sharing. The -W option tells open to wait until Screen Sharing is quit.
At this point, Screen Sharing should be running and showing the screen of the remote computer. I usually have Screen Sharing run in full screen mode and set to scale the 2560×1440 display of my iMac to fit entirely within the 1440×900 MacBook Air display. It’s not the easiest thing in the world to read, but I usually only need to run a few commands remotely.
When I’m done with Screen Sharing, control returns to the script, and Line 7 is executed. It kills the tunnel process started in Line 3.
Depending on how you have SSH configured on your computer and your history of using it, this script may ask for passwords. If you save them in your Keychain, it won’t ask you again.
This script was given in the comments of this post from a couple of years ago. Because I stopped showing comments when I switched to a static site, I can’t see the full set of circumstances under which it arose. Because I mention it in the body of the post without crediting anyone else, I assume I wrote it myself. If you know different, send me a note, and I’ll give proper credit here.
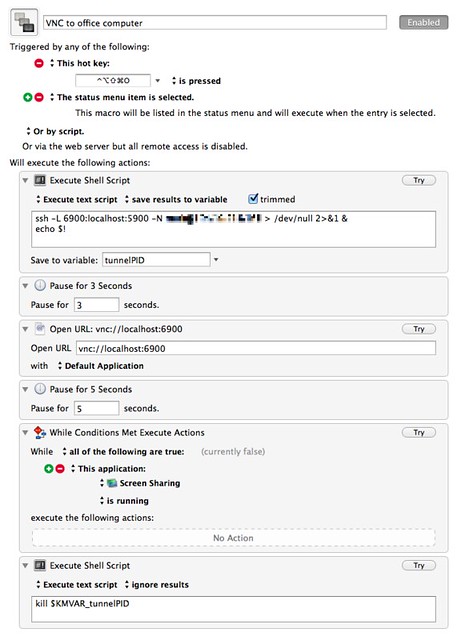
Something I know I didn’t come up with on my own is a Keyboard Maestro macro that mimics the behavior of workscreen without requiring an open Terminal window. Alan Schmitt came up with that, and my version here is essentially his with a couple of minor changes.
I suppose this could be reduced to just a single shell script action with all the contents of workscreen, but breaking it up this way seems more Maestro-ish.
I used various versions of workscreen for years before I owned Keyboard Maestro, and I still use it sometimes purely out of habit. The advantage of the KM macro is that I don’t have an orphaned Terminal window that needs to be deleted after the remote session is over.
Update 12/1/14 1:39 PM
I know there are other ways to do essentially the same thing: virtual private networking (VPN) and Back to My Mac, for example. If you use one of those and it works for you, by all means stick with it. I’m not advocating my system, just showing how I do it. By the same token, I’ve been using SSH tunneling with high reliability for 15 years, which is why I’m loath to try anything else.


