An image and PDF grab bag
September 4, 2018 at 11:42 PM by Dr. Drang
In my job, I often refer to provisions of building codes or material and equipment standards in my reports. Usually, simply quoting the relevant provisions is sufficient, but sometimes I need to attach one or more pages from these documents as an addendum. In the old days, that meant photocopies; now it typically means pulling pages out of PDFs. Preview is pretty good tool for this, as it allows you to use the thumbnail sidebar to extract and rearrange pages. But I recently ran into a situation where Preview couldn’t do the job alone, and I had to use a series of command-line tools to get the job done.
The problem is with the American Institute of Steel Construction, which has decided to publish its essential Steel Construction Manual as a website instead of a PDF. Each “page” of the website looks like the corresponding page of the print edition of the manual.

Having this website instead of a PDF is moderately annoying when I’m trying to use the manual, it’s really annoying when I need to pull out excerpts, because I have to make screenshots of each page, edit them, convert them to PDFs, resize them to fit on letter-sized pages, and assemble them into a single coherent PDF document. Here’s how I do it.
First, I take the screenshots on my 9.7″ iPad Pro in portrait mode (see above) because that gives me good resolution of a single page. I could get slightly higher resolution by taking the screenshots on my 2017 27″ 5k iMac, but that machine isn’t available when I’m working at home, where the Mac on my desk is a non-Retina 2012 27″ iMac. After screenshotting, I have a bunch of JPEG files on my iPad, which I copy over to my Mac via the Files app and Dropbox.
Next, I move to the Mac (whichever one is handy) and crop each image down to just the page image, eliminating all the browser chrome and navigation controls. For this I use the mogrify command from the ImageMagick suite of tools to crop the images in place.1 After a bit of trial and error, I learned that
mogrify -crop 1214x1820+162+224 image.jpg
gives the crop size and offset that leaves just the page image.

Of course, I don’t want to enter this command for every screenshot, so I wrote a shell script, called aisc-crop, which loops through all of its arguments, running the mogrify command on each:
bash:
!/bin/bash

for f in "$@"
do
  mogrify -crop 1214x1820+162+224 "$f"
done
With this, I can crop all the images in a directory with a single command:
aisc-crop *.JPG
Now that I have the page images I want, it’s time to turn them into PDFs. For this, I use the built-in sips command, but sips wants the extension to be .pdf before it does the conversion. So I use Larry Wall’s old rename Perl script:
rename 's/JPG/pdf/' *.JPG
Now the files are ready for conversion:
sips -s format pdf *.pdf
Time to put all the pages together into a single PDF document. For this, I like using PDFtk (which can also be installed via Homebrew):
pdftk *.pdf cat output aisc-pages.pdf
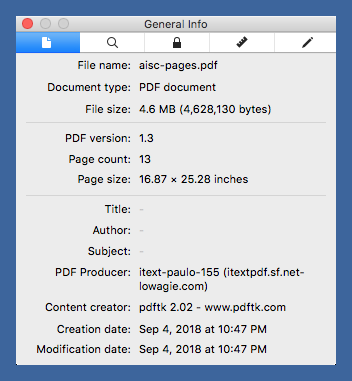
At this point, I have a PDF document with all the pages I want, but the pages aren’t letter-sized. If I open the document in Preview and Get Info on it, I see this:

The page size is so big because sips treated every pixel in the JPEG as a point in the converted PDF. Since there are 72 points per inch, the PDF pages are high. To get the PDF down to letter size, I use pdfjam, which got installed along with my TeX installation:
pdfjam --paper letterpaper --suffix letter aisc-pages.pdf
Now I have a document named aisc-pages-letter.pdf that’s the right physical size with higher dpi of the embedded images. I could have gotten the same result by “printing” aisc-pages.pdf to a new PDF with the Scale to Fit option selected in the Print sheet, but where’s the fun in that?
Now I can open the document in Preview and rearrange the pages if I didn’t take the screenshots in the right order. Otherwise, I’m done. As is often the case, it takes longer to explain than to do.
-
ImageMagick used to be kind of hard to install on a Mac, but not anymore. As Jason Snell showed us a couple of months ago, just use Homebrew and
brew install imagemagick. ↩
