Framed iPhone screenshots with Python
September 23, 2025 at 1:33 PM by Dr. Drang
After getting my new iPhone 17 Pro last Friday, I decided I should update my system for framing iPhone screenshots. This should have meant just downloading new templates from the Apple Design Resources page and changing a filename in the Retrobatch workflow, but I decided to effectively start from scratch.
This wasn’t just for the fun of doing it. My previous system had two problems:
- It typically would frame just one screenshot when I invoked the Keyboard Maestro macro with several screenshots selected.
- It usually left Retrobatch open even though the last step in the KM macro was to quit Retrobatch.
I suspected both of these problems could be solved—as many Keyboard Maestro problems can—by adding a Pause action here or there. But I always feel kind of dirty doing that; it’s very much a trial-and-error process that leaves me with no useful knowledge I can apply later. The necessary pauses depend on the applications being automated and the speed of the machine the macro is running on. Also, a safe pause (or set of pauses) slows down the macro, and I thought my framing macro was already on the slow side.
My substitute for Retrobatch was Python and the Python Imaging Library (PIL), which is now available through the Pillow project. The script I wrote, called iphone-frame, can be run from the command line on the Mac like this:
iphone-frame IMG_4907.PNG
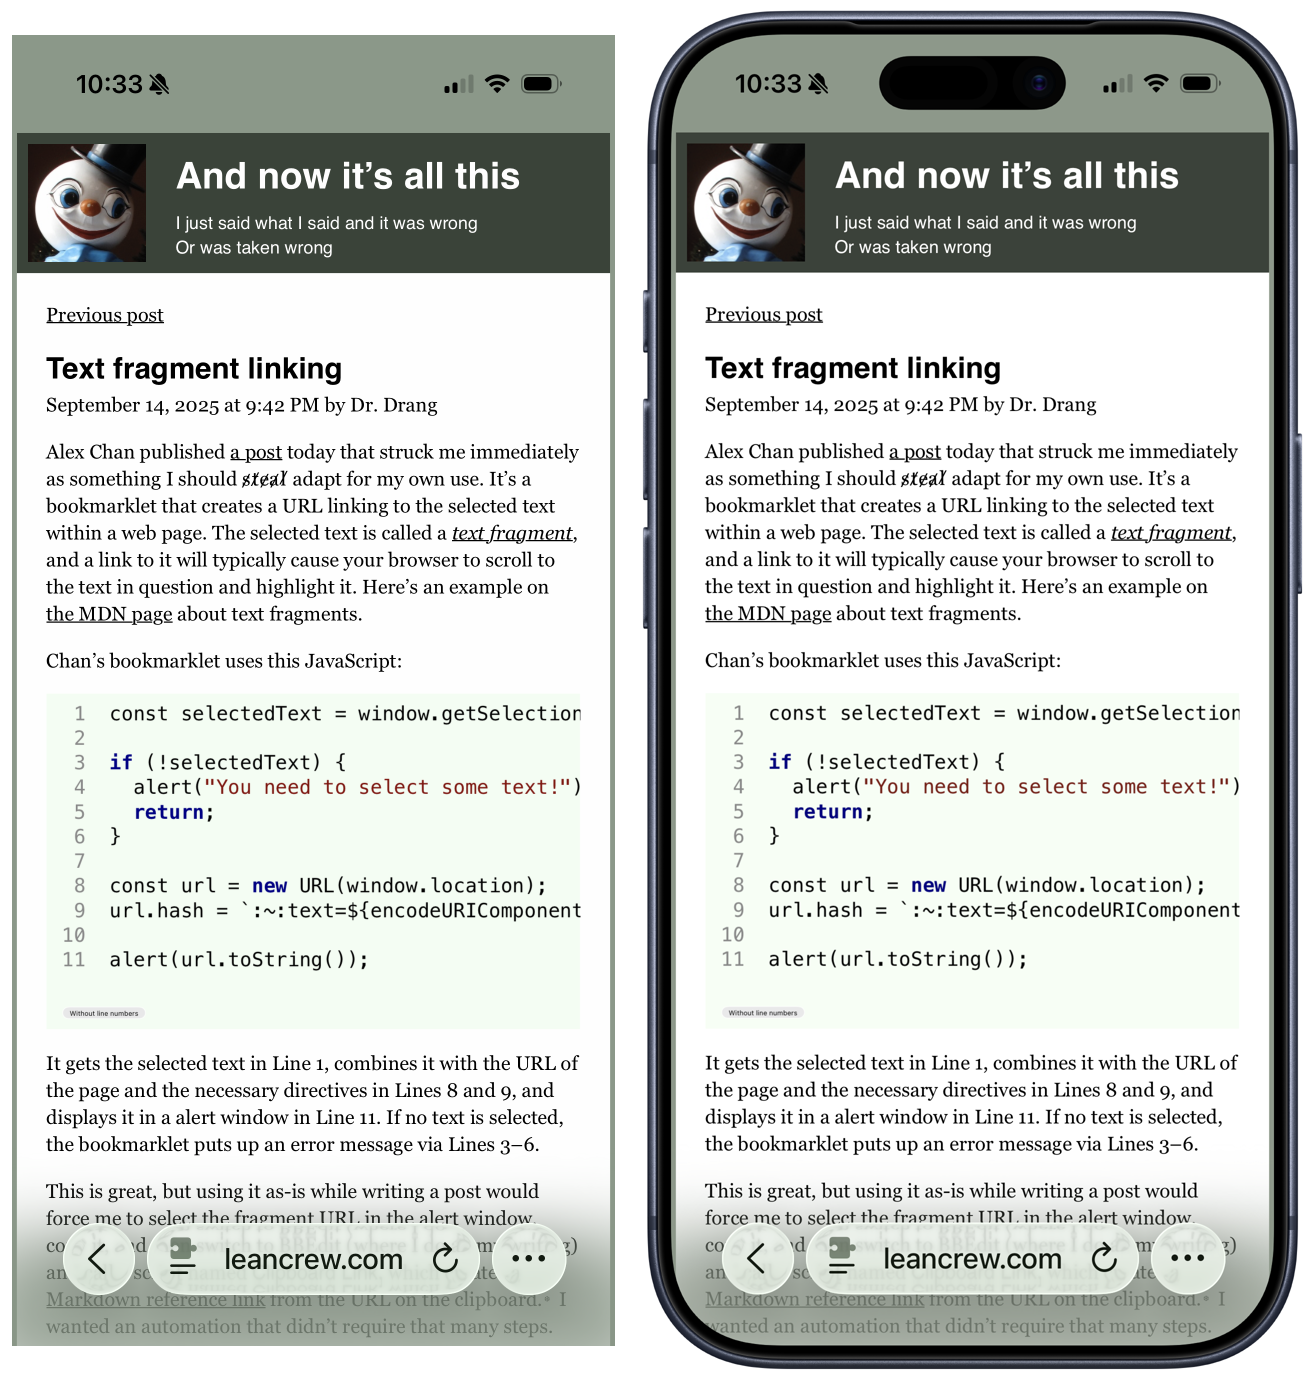
where IMG_4907.PNG is the name of an iPhone screenshot dragged out of the Photos app into the current working directory. This will turn the raw screenshot on the left into the framed screenshot on the right:

I have the deep blue phone, so that’s the template I use to frame my screenshots. It’s in this download from the Design Resources page.
Because I often don’t need the full resolution in these framed screenshots, frame-iphone has an option to cut the resolution in half:
iphone-frame -h IMG_4907.PNG
Full resolution is 1350×2760 pixels (for portrait), and half resolution is 675×1380.
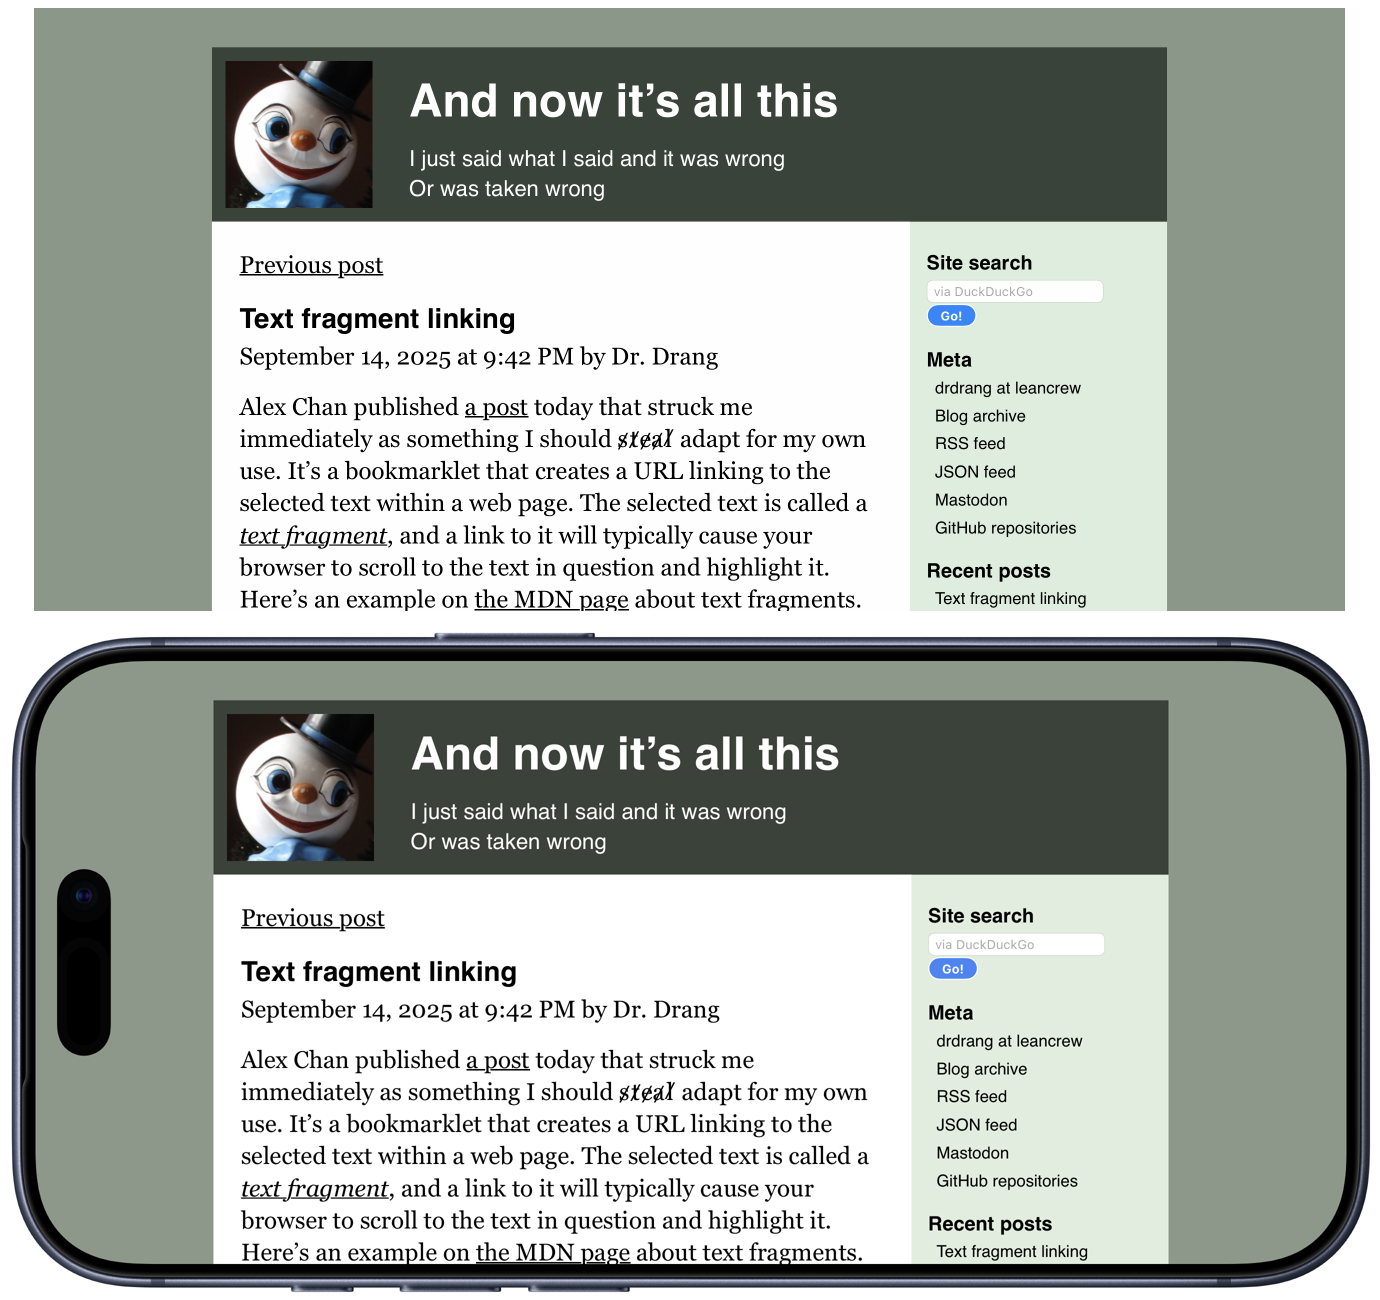
I don’t do landscape screenshots very often, but iphone-frame can handle them with no change in how it’s called.
iphone-frame IMG_4908.PNG
turns the raw screenshot on the top into the framed screenshot below it.

iphone-frame can be run with more than one argument. If I’ve dragged out several screenshots, I can frame them all by running something like
iphone-frame IMG*
In a call like this, I don’t have to distinguish between the portrait and landscape screenshots—iphone-frame works that out on its own.
One other thing: if iphone-frame is called with no arguments, it reads the file names from standard input, one file per line. This gets used by a Keyboard Maestro macro that calls iphone-frame, which we’ll get to later.
Here’s the source code:
python:
 1:  #!/usr/bin/env python3
 2:
 3:  from PIL import Image, ImageDraw
 4:  import os
 5:  import sys
 6:  import getopt
 7:
 8:  # Parse the command line
 9:  half = False
10:  opts, args = getopt.getopt(sys.argv[1:], 'h')
11:  for o, v in opts:
12:    if o == '-h':
13:      half = True
14:
15:  # If there are no arguments, get the screenshot file paths from stdin
16:  if not args:
17:    args = sys.stdin.read().splitlines()
18:
19:  # Open the iPhone portrait mode frame
20:  pframe = Image.open(f'{os.environ['HOME']}/Library/Mobile Documents/com~apple~CloudDocs/personal/iphone-overlays/iPhone 17 Pro - Deep Blue - Portrait.png')
21:
22:  # Apply the appropriate frame to each screenshot
23:  for a in args:
24:    # Open the original screenshot
25:    shot = Image.open(a)
26:
27:    # Rotate the frame if the screenshot was in landscape
28:    if shot.size[0] > shot.size[1]:
29:      frame = pframe.rotate(90, expand=True)
30:    else:
31:      frame = pframe
32:
33:    # Offsets used to center the screenshot within the frame
34:    hoff = (frame.size[0] - shot.size[0])//2
35:    voff = (frame.size[1] - shot.size[1])//2
36:
37:    # Round the screenshot corners so they fit under the frame
38:    # Use a 1-bit rounded corner mask with corner radius of 100
39:    mask = Image.new('1', shot.size, 0)
40:    draw = ImageDraw.Draw(mask)
41:    draw.rounded_rectangle((0, 0, shot.size[0], shot.size[1]), radius=100, fill=1)
42:    shot.putalpha(mask)
43:
44:    # Extend the screenshot to be the size of the frame
45:    # Start with transparent image the size of the frame
46:    screen = Image.new('RGBA', frame.size, (255, 255, 255, 0))
47:    # Paste the screenshot into it, centered
48:    screen.paste(shot, (hoff, voff))
49:
50:    # Put the frame and screenshot together
51:    screen.alpha_composite(frame)
52:
53:    # Make it half size if that option was given
54:    if half:
55:      screen = screen.resize((screen.size[0]//2, screen.size[1]//2))
56:
57:    # Save the framed image, overwriting
58:    screen.save(a)
I hope there are enough comments to explain what’s going on, but I do want to mention a few things:
- While the
getoptmodule is said to be “superseded” in the Python docs, it hasn’t been removed and almost certainly won’t be. Because this script has only one option, I thoughtgetoptwas the most straightforward way to deal with it. - Although Apple supplies a landscape template file, I didn’t see any reason to use it. It’s easy enough to just rotate the portrait template. I have my copy of the portrait template stored a few directories down in iCloud Drive, which is why the
opencommand in Line 20 is so long. - As you can see from the screenshots above, the corners of the raw screenshot have to be rounded off before putting the frame over it. Otherwise the corners would peek out beyond the frame. I use a radius of 100 pixels to do the rounding. This doesn’t try to match the inside radius of the frame, it just keeps the screenshot corners hidden under the frame.
- The PIL modules used in the script are
ImageandImageDraw. The corners of the screenshot are rounded by using a mask image and theputalphafunction. The mask is a black rectangle with a white rounded rectangle drawn within it using (unsurprisingly) therounded_rectanglefunction. Whenputalphais called, the parts of the screenshot that correspond to the black parts of the mask are removed and the parts that correspond to the white parts of the mask are kept. The frame is then put over the screenshot using thealpha_compositefunction. - There’s really no error handling in this script. I expect to use this with images that I know are screenshots from my iPhone Pro, so I don’t feel the need to, for example, check their sizes before altering them. And if I do happen to screw up, the consequences aren’t dire—the original screenshots are still in the Photos app.
- Because I’m at the mercy of Apple and how it supplies its templates, I can’t say this script is future proof, but I did my best. No matter the size of future phone screens, I suspect Apple will make templates that are meant to be aligned with the center of the screenshot. The only magic number in the script is the mask radius of 100, and that should continue to work unless Apple makes the iPhone corners either much more rounded or much more squared off.
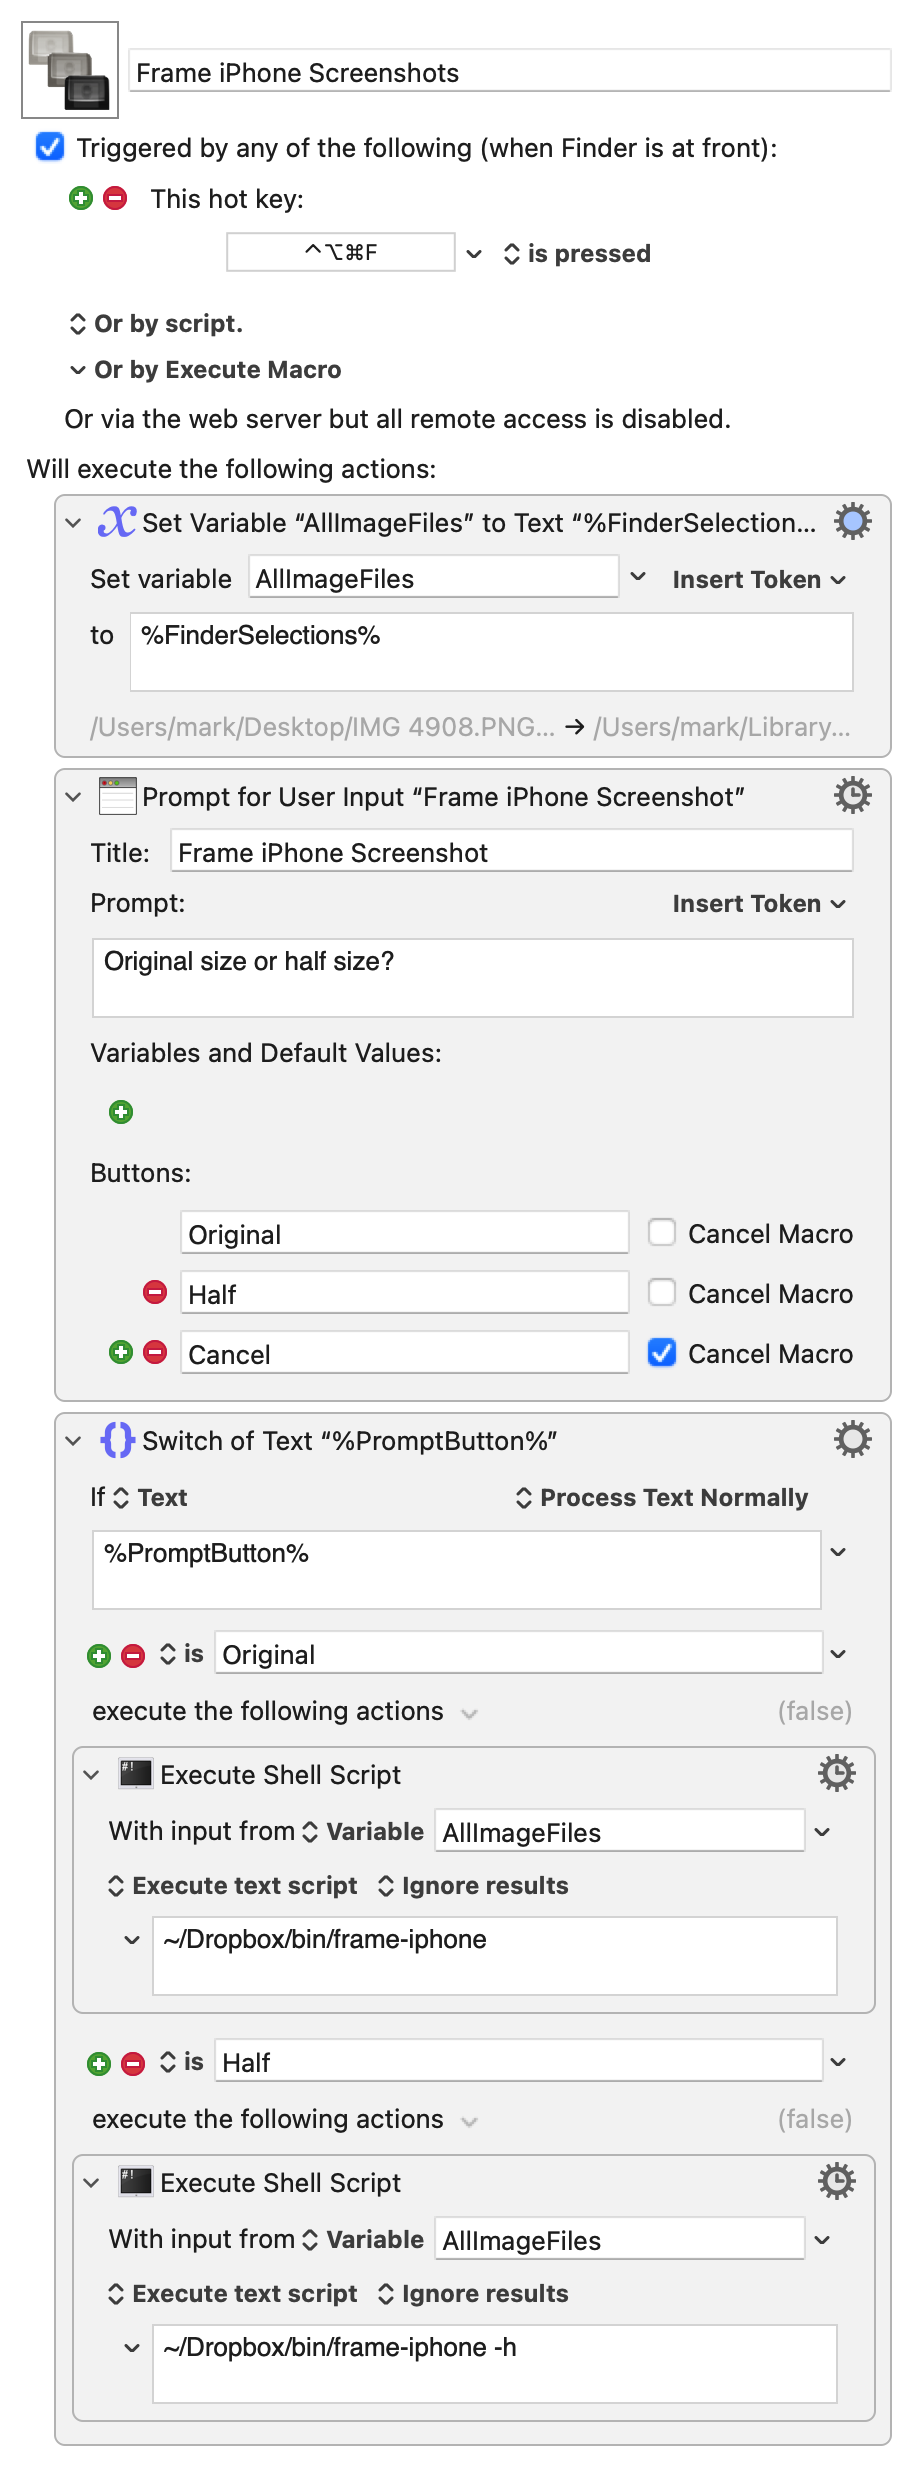
OK, iphone-frame is easy to use if I already have a Terminal window open and the working directory set to where I’ve dragged the screenshots. This is a pretty common situation for me, but it’s also common that I don’t have a Terminal window open, and that’s when a quick GUI solution is best. I get that through this Keyboard Maestro macro, which you can download.

To use this in the Finder, I select the screenshot images I want to frame and press ⌃⌥⌘F. A window appears, asking if I want the framed screenshots to be original size or halved.

In very short order, the images change from raw screenshots to framed screenshots. They might also rearrange themselves if I have my Finder window sorted by Date Modified.
The only comment I have on the Keyboard Maestro macro is that the %FinderSelections% token returns a list of the full path names to each selected file, one file per line. That means it’s in the right form to send to iphone-frame as standard input. I don’t think I can send a token directly to a shell script, which is why I set the variable AllImageFiles to the contents of %FinderSelections%.
It’s only been a few days, but this new system seems to be working well. You’ll probably be seeing framed screenshots from me in the near future as I start to complain about fit and finish (or lack of same) in iOS 26.
