Mac screenshots for the nth time
October 6, 2025 at 2:33 PM by Dr. Drang
After building my iPhone screenshot framing system, I decided to tackle the problem of Mac screenshots. I’ve been using CleanShot X for a while, but the small annoyances that come with using it have been weighing on me, and it seemed like a good time to return to a system built especially for my needs.
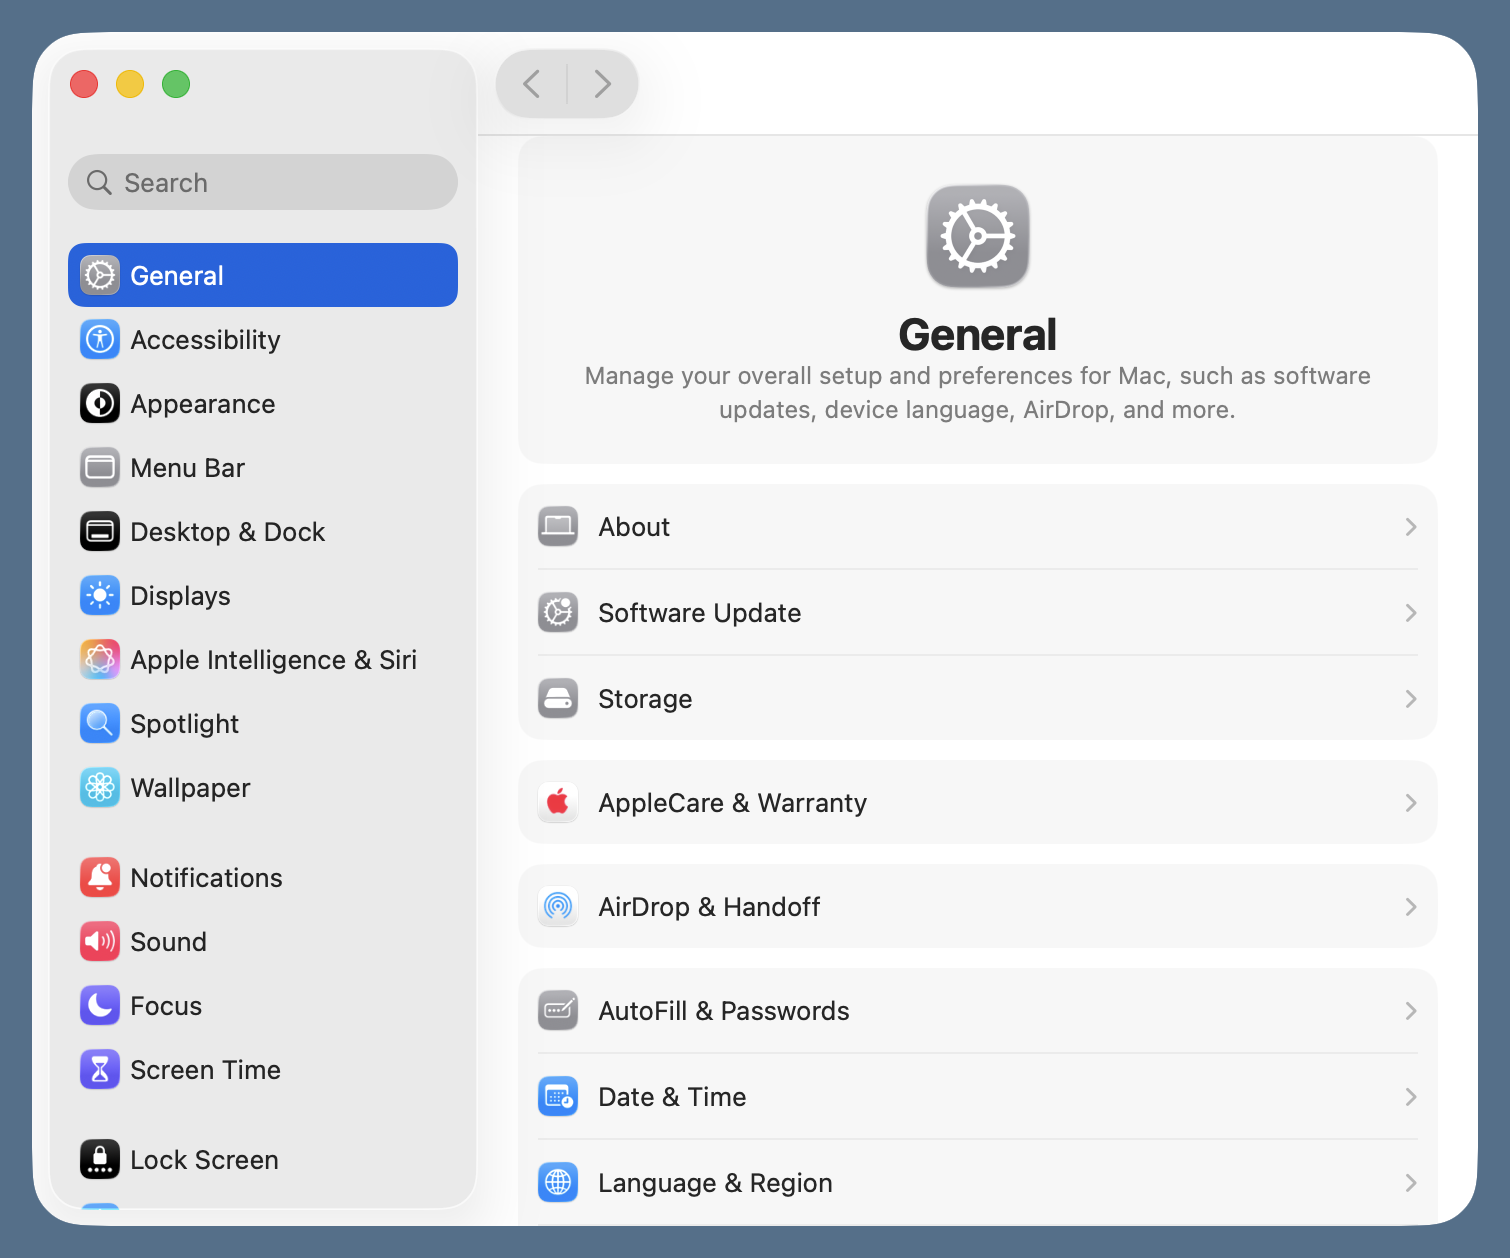
I have some very particular ideas about how Mac screenshots should look. They shouldn’t include the shadow, as that takes up too much space and detracts from the window itself.1 They do, however, need some sort of border if you’re putting them on a white background; otherwise, the screenshot looks incomplete. I like adding relatively thin solid color around my window screenshots so they look like they’re on my Desktop. My wallpaper is a solid dull blue, so that’s what I use for my window screenshot borders. Finally, the window corners should be rounded just as I see them on my screen.
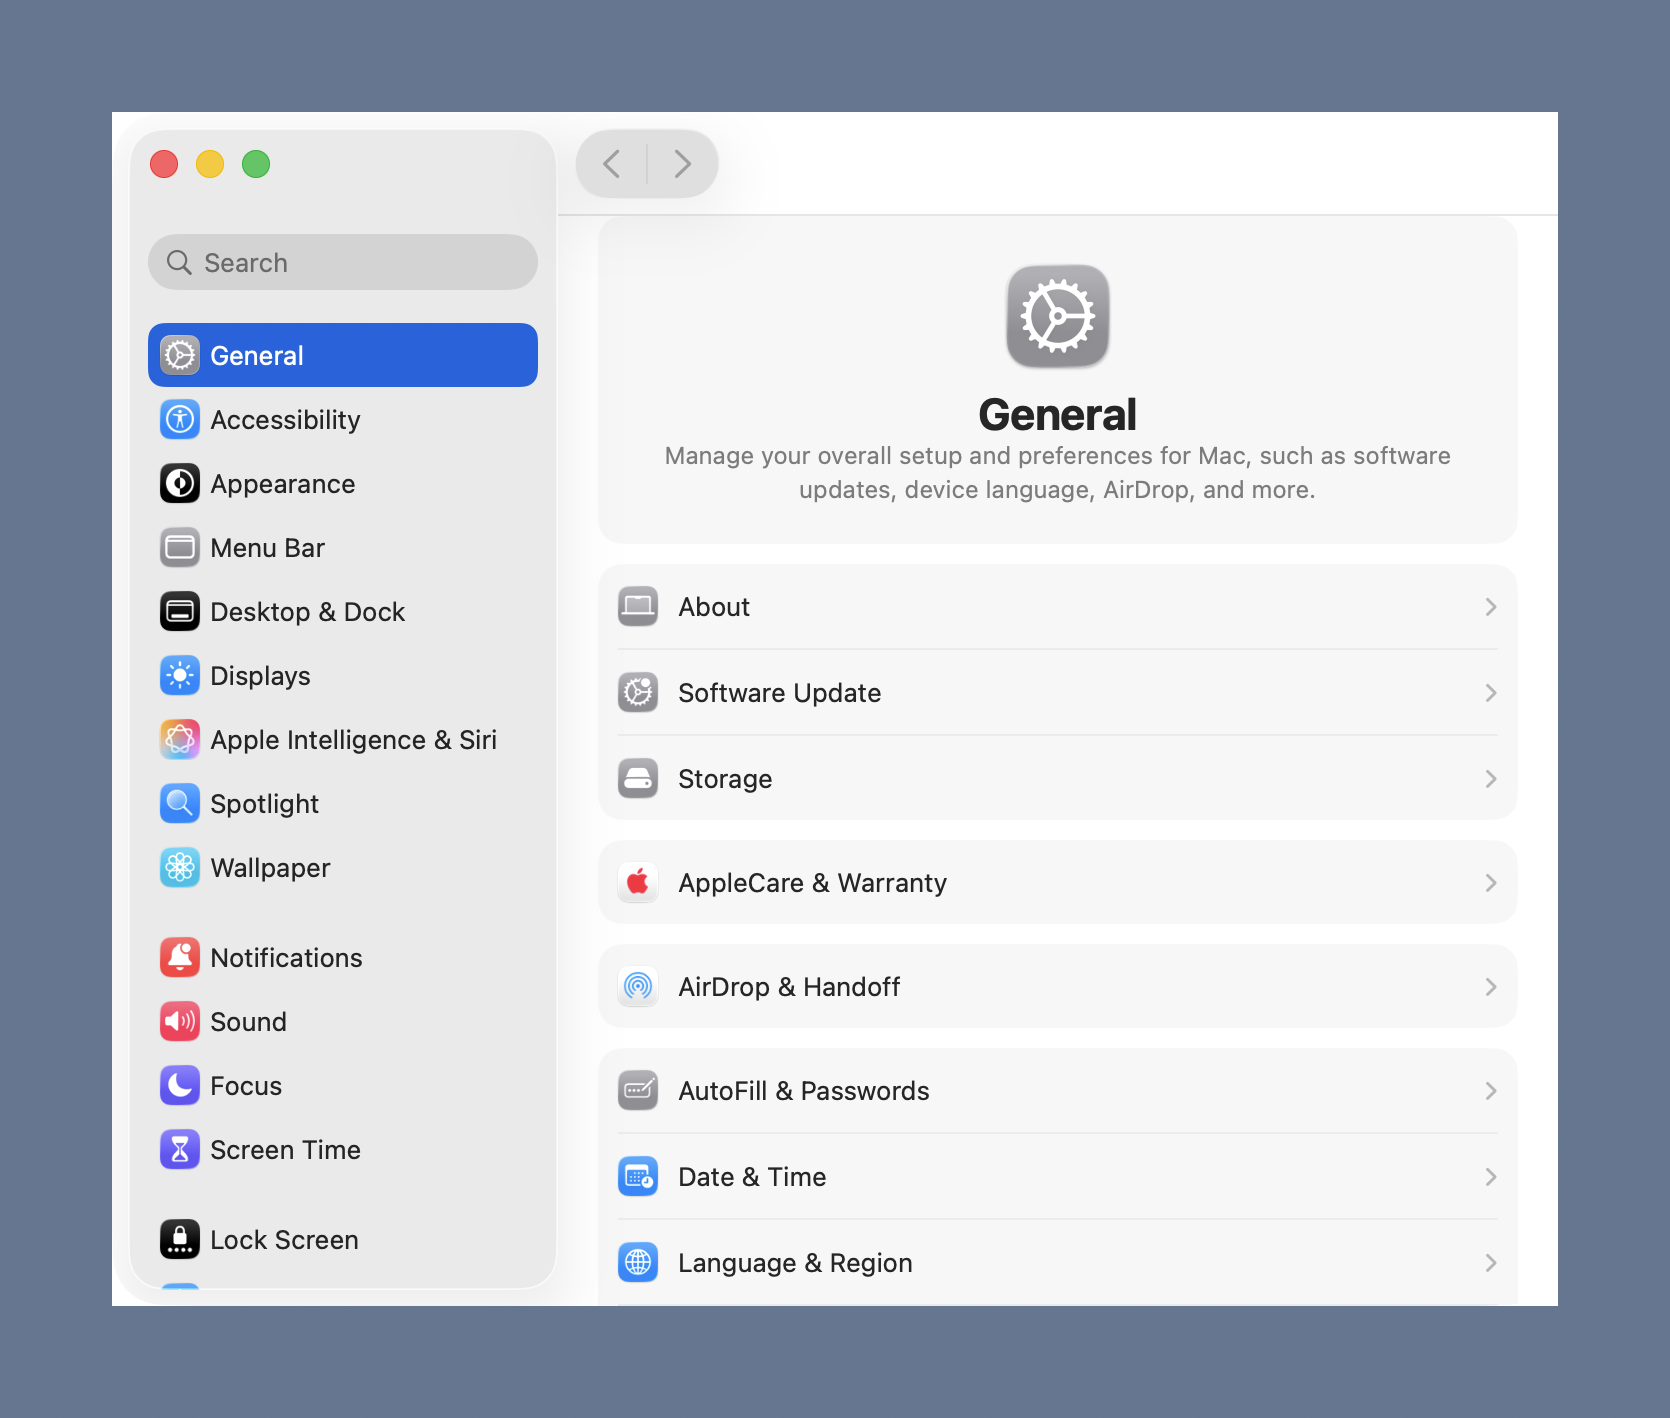
CleanShot X’s window screenshots don’t meet these particulars. It’s not hard to tweak things—either during the screenshot or through postprocessing—to get what I want, but I’m tired of doing the tweaks. The smallest border CleanShot X will give is much larger than I want. And for some reason, the window corners are squared off, not rounded. This, I learned, got especially noticeable with Tahoe’s especially rounded corners. As an example, here are two screenshots of the Tahoe System Settings window.
The first is what I want:

The second is what CleanShot X gives by default:

One way to get around this in CleanShot X is to take a rectangular selection screenshot instead of a window screenshot. But that typically means hiding all the other windows on my screen and then being careful as I drag out the rectangular selection. I’ve had enough of the extra effort.
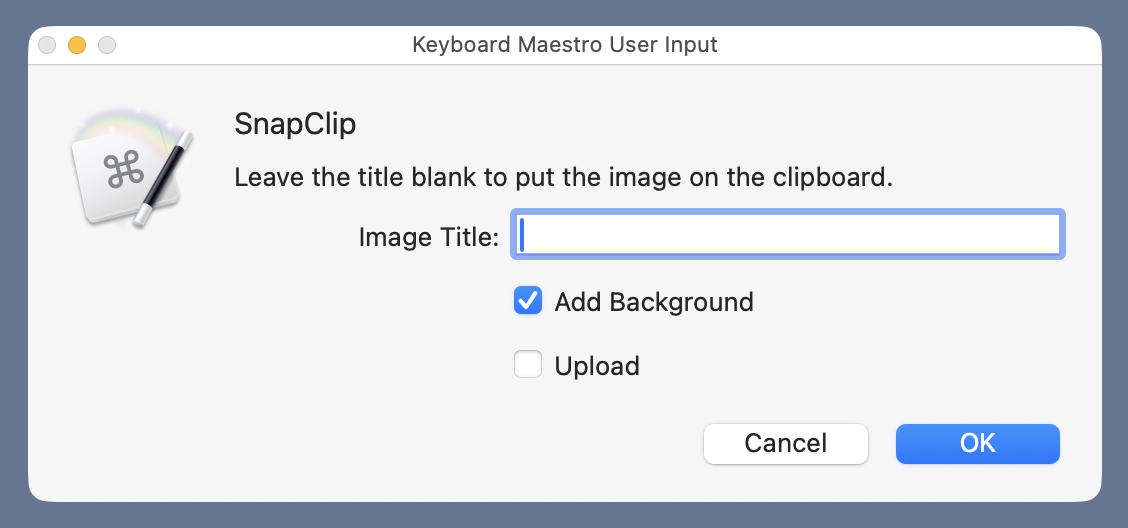
Instead, I put my effort into writing code that does exactly what I want. The result is a Keyboard Maestro macro called SnapClip that puts up this window:

After I set the options, the cursor turns into a camera. I place it over the window I want a screenshot of and click. Depending on the options, the screenshot will either be on my clipboard, saved to the Desktop, or saved to the Desktop and uploaded to the leancrew server. (Turning the option off is for taking rectangular selection screenshots, which I can switch to by pressing the space bar.)
If you’ve been reading ANIAT for a while, you may remember that I’ve had different versions of SnapClip over the years. This is a new one. Some of its components were lifted straight from the old versions, some were adapted from old code, and some are brand new. I’m not going to link to any of my old screenshot code—you can search the archives as well as I can.
The main work is done by a Python script, called screenshot. It can be called from the Terminal with options that match up with the SnapClip options shown above. Here’s the help message for screenshot:
usage: screenshot [-h] [-b] [-u] [-t TITLE]

Like ⇧⌘4, but with more options.

options:
    -h, --help         show this help message and exit
    -b, --background   add desktop background border
    -u, --upload       upload to images directory and print URL
    -t, --title TITLE  image title

Starts in window capture mode and can add a border to the
screenshot. If a title is given, it saves the image to a file
on the Desktop with a filename of the form yyyymmdd-title.png.
If no title is given, the image is put on the clipboard and the
upload option is ignored.
And here’s the source code:
python:
 1:  #!/usr/bin/env python3
 2:
 3:  import tempfile
 4:  from PIL import Image
 5:  import os
 6:  import subprocess
 7:  import shutil
 8:  from datetime import datetime
 9:  import urllib.parse
10:  import argparse
11:
12:  # Handle the arguments
13:  desc = 'Like ⇧⌘4, but with more options.'
14:  ep = '''Starts in window capture mode and can add a border to the
15:  screenshot. If a title is given, it saves the image to a file
16:  on the Desktop with a filename of the form yyyymmdd-title.png.
17:  If no title is given, the image is put on the clipboard and the
18:  upload option is ignored.'''
19:  parser = argparse.ArgumentParser(description=desc, epilog=ep,
20:            formatter_class=argparse.RawDescriptionHelpFormatter)
21:  parser.add_argument('-b', '--background', help='add desktop background border', action='store_true')
22:  parser.add_argument('-u', '--upload', help='upload to images directory and print URL', action='store_true')
23:  parser.add_argument('-t', '--title', help='image title', type=str)
24:  args = parser.parse_args()
25:
26:  # Parameters
27:  type = "png"
28:  localdir = os.environ['HOME'] + "/Pictures/Screenshots"
29:  tf, tfname = tempfile.mkstemp(suffix='.'+type, dir=localdir)
30:  bgcolor = (85, 111, 137)
31:  border = 32
32:  optimizer = '/Applications/ImageOptim.app/Contents/MacOS/ImageOptim'
33:
34:  # Capture a portion of the screen and save it to a temporary file
35:  status = subprocess.run(["screencapture", "-iWo", "-t", type, tfname])
36:
37:  # Add a desktop background border if asked for
38:  if args.background:
39:    snap = Image.open(tfname)
40:    # Make a solid-colored background bigger than the screenshot.
41:    snapsize = tuple([ x + 2*border for x in snap.size ])
42:    bg = Image.new('RGBA', snapsize, bgcolor)
43:    bg.alpha_composite(snap, dest=(border, border))
44:    bg.save(tfname)
45:
46:  # Optimize the file
47:  subprocess.run([optimizer, tfname], stderr=subprocess.DEVNULL)
48:
49:  # Save it to a Desktop file if a title was given; otherwise,
50:  # save it to the clipboard
51:  if args.title:
52:    sdate = datetime.now().strftime("%Y%m%d")
53:    desktop = os.environ['HOME'] + "/Desktop/"
54:    fname = f'{desktop}{sdate}-{args.title}.{type}'
55:    shutil.copyfile(tfname, fname)
56:    bname = os.path.basename(fname)
57:
58:    # Upload the file and print the URL if asked
59:    if args.upload:
60:      year = datetime.now().strftime("%Y")
61:      server = f'user@server.com:path/to/images{year}/'
62:      port = '123456789'
63:      subprocess.run(['scp', '-P', port, fname, server])
64:      bname = urllib.parse.quote(bname)
65:      print(f'https://leancrew.com/all-this/images{year}/{bname}')
66:  else:
67:    subprocess.call(['impbcopy', tfname])
68:
69:  # Delete the temporary file
70:  os.remove(tfname)
There’s a lot going on in those 70 lines. Let’s go through them a chunk at a time.
Lines 13–24 use the argparse module to process the options. I’ve always shied away from argparse. It seemed more complicated than necessary, so I used docopt instead. But after reading this tutorial, I decided to give it a go. It wasn’t as complicated as I thought, and you can probably work out what it does without much commentary from me. I will say the following:
- The
-hand--helpoptions and the help message are created automatically byargparse. That’s why you don’t see any code that builds or prints the list of options. - The
descriptionis the optional part of the help message that comes between the usage and options sections. - The
epilogis the optional part that comes after the options section. - Creating the
ArgumentParserwithRawDescriptionHelpFormatteras theformatter_classmeans that thedescriptionandepilogare printed as-is, without line wrapping. I used this to make sure the filename format string,yyyymmdd-title.png, didn’t get broken over two lines.
Lines 27–32 define a set of parameters that will be used later in the script. We’ll talk about them as they come up.
Line 35 calls the screencapture command. This is a macOS command that works sort of like a combination of ⇧⌘3 and ⇧⌘4, but with more options. It’s called with -i, which puts it in interactive mode; -W, which starts it in window selection mode instead of rectangular selection mode; -o, which keeps the shadow out of the screenshot if a window is captured; and -t, which sets the type of the resulting image file. The argument of -t is the filetype, which is defined as png in Line 27. The final argument, tfname, is the file where the screenshot is saved. The file name is defined in Lines 27–29 with the help of the tempfile module.
At this point, we have a temporary file with the screenshot. The rest of the code processes it.
Lines 38–44 add a background border if the -b option to screenshot was given. The Python Imaging Library (PIL) opens the temporary file just created, makes a new rectangular image that’s larger than the screenshot by border (defined on Line 31) on all sides. This rectangle is filled with my Desktop color, bgcolor, an RGB tuple defined on Line 30. The two images are then composited together, honoring the alpha channel in the screenshot image. The result is saved back into the temporary file.
Line 47 uses the ImageOptim app to make the PNG file smaller. I do this to be a good web citizen. Although ImageOptim is a GUI application, it has a command line program buried in its package contents. The path to that program, stored in the variable optimizer, is defined on Line 32. You’ll note that the call to subprocess.run includes a directive to send the standard error output to /dev/null. That’s because the ImageOptim command generates a long diagnostic message as it processes the PNG and I don’t want that appearing when screenshot is run.
Lines 51–67 put the newly optimized image file somewhere. If the -t option was used, the image file is saved to the Desktop with a filename determined by the date and the -t argument. If the -t option wasn’t used, the image is put on the clipboard.
Putting the image on the clipboard requires a command that doesn’t come with macOS, impbcopy. This is a lovely little utility written about a decade ago by Alec Jacobson. It’s basically an image analog to the built-in pbcopy command, which only works with text. impbcopy takes an image file as its argument and puts the image on the clipboard.
If the -u option was used, the file is uploaded to my server via the scp command and the URL of the image is printed. The upload parameters shown here in Lines 61 and 62 have been changed from the actual values. The upload code runs only if an image file was saved. If you run screenshot with -u but no -t option, the -u will be ignored.
You’ll note there’s nothing about SSH keys in the code. I confess I can’t remember whether this is unnecessary because of entries in my ~/.ssh directory, the Keychain Access app, or something else. I do remember granting access via SSH to my server many years ago, and every OS X/macOS upgrade since then has honored that.
Finally, Line 70 deletes the temporary file.
The SnapClip macro (which you can download) is just a GUI wrapper around screenshot. Here’s what it looks like:

Nested if statements are a pain to deal with in graphical coding environments like Keyboard Maestro. I gave the ifs different colors with the hope of making it easier to read, but I’m not convinced it’s much better. You might find this pseudocode easier to follow:
Show window with prompts for user input
If title
  If background
    If upload
      screenshot -bu -t title
    Else
      screenshot -b -t title
  Else
    If upload
      screenshot -u -t title
    Else
      screenshot -t title
Else
  If background
    screenshot -b
  Else
    screenshot
Play sound
A couple of notes on the macro:
- Long ago, I got in the habit of keeping the scripts I wrote in a
bindirectory in Dropbox. I probably should stop doing that, as iCloud syncing is fine, and I don’t use multiple Macs anymore. Anyway, that bit of history is why you see references to~/Dropbox/bin/screenshotin the macro. - Most of the calls to execute
screenshotare set to ignore the output. The exceptions are when the image file is uploaded. When that occurs,screenshotprints the URL of the uploaded image file, and that gets saved to the clipboard. - Although the
printfunction on Line 65 ofscreenshotadds a linefeed at the end of the URL, that linefeed won’t be on the clipboard when SnapClip is run. That’s because Keyboard Maestro is clever; it knows you probably don’t want the trailing linefeed and trims it automatically. (If you do want the linefeed, there’s a option in the gear menu to turn off the trimming.)
It’s entirely possible that I’ve missed some options in CleanShot X that would make its screenshots closer to what I want. I could also try another screenshot app, like Shottr, which Allison Sheridan has sung the praises of. But this new SnapClip handles everything I do with screenshots other than annotation (for which I use Acorn or OmniGraffle), so I’m not inclined to switch.
-
Don’t get me wrong, I like window shadows when I’m working. They help clarify the window stacking and have done so since the very beginning. But they’re unnecessary in a screenshot of a single window. ↩
