Text fragment linking
September 14, 2025 at 9:42 PM by Dr. Drang
Alex Chan published a post today that struck me immediately as something I should s̸t̸e̸a̸l̸ adapt for my own use. It’s a bookmarklet that creates a URL linking to the selected text within a web page. The selected text is called a text fragment, and a link to it will typically cause your browser to scroll to the text in question and highlight it. Here’s an example on the MDN page about text fragments.
Chan’s bookmarklet uses this JavaScript:
javascript:
 1:  const selectedText = window.getSelection().toString().trim();
 2:
 3:  if (!selectedText) {
 4:    alert("You need to select some text!");
 5:    return;
 6:  }
 7:
 8:  const url = new URL(window.location);
 9:  url.hash = `:~:text=${encodeURIComponent(selectedText)}`;
10:
11:  alert(url.toString());
It gets the selected text in Line 1, combines it with the URL of the page and the necessary directives in Lines 8 and 9, and displays it in a alert window in Line 11. If no text is selected, the bookmarklet puts up an error message via Lines 3–6.
This is great, but using it as-is while writing a post would force me to select the fragment URL in the alert window, copy it, and then switch to BBEdit (where I do all my writing) and call a script named , which creates a Markdown reference link from the URL on the clipboard.1 I wanted an automation that didn’t require that many steps.
So I made this Keyboard Maestro macro:
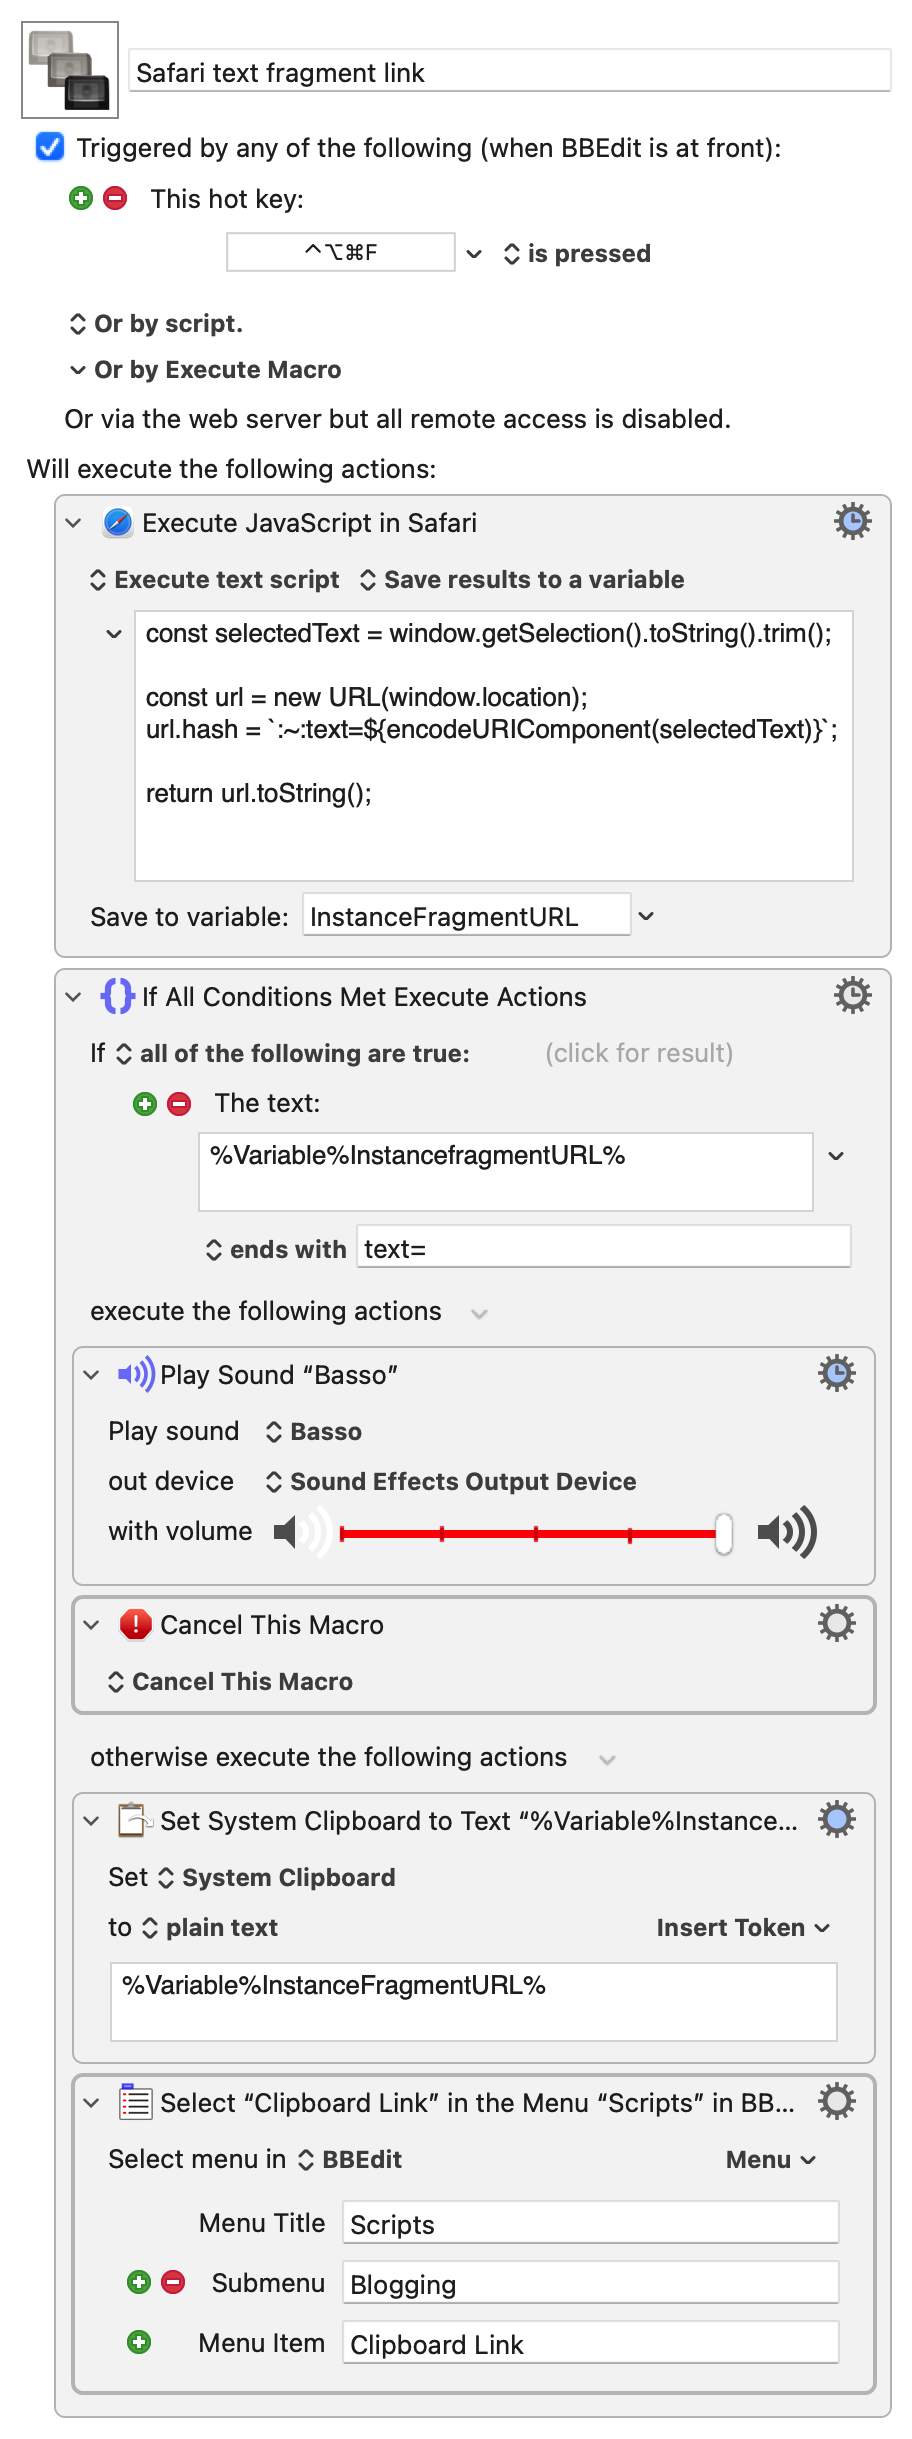
As you can see, this macro is meant to be run while BBEdit is the active application and can be called with the ⌃⌥⌘F hotkey. It executes a slightly edited version of Chan’s JavaScript:
javascript:
1:  const selectedText = window.getSelection().toString().trim();
2:
3:  const url = new URL(window.location);
4:  url.hash = `:~:text=${encodeURIComponent(selectedText)}`;
5:
6:  return url.toString();
The differences are that there’s no error handling (that’s done elsewhere in the macro) and it puts the text fragment URL into a Keyboard Maestro variable named InstanceFragmentURL instead of displaying an alert.
If InstanceFragmentURL ends with text=, we know that there was no selected text when the macro was invoked. That’s an error, so the Basso sound is played to tell me I made a mistake, and the macro is canceled. Otherwise, the text fragment URL is put on the clipboard and the script is run by choosing it from the submenu of BBEdit’s menu.
You should know that this macro, like Chan’s bookmarklet, creates only the simplest kind of text fragment URL, and it links to the first instance of the text on the page. That might not be the instance you want to link to. For example, if I select this instance of the word “bookmarklet” on Chan’s page,

and call the macro, it will make this link, which goes to the word “bookmarklet” in the post’s title.
The MDN page on text fragments explains a set of directives that can be added to the URL to adjust which instance is linked. The prefix- and -suffix directives should be sufficient to uniquely define the fragment. If I need to do so, I’ll add them manually. Like this. I doubt there’s a good way to automate the addition of these directives, so I’m not going to waste my time trying.
I always know I’m going to learn something when Chan’s blog appears in my RSS feed. Today I was able to use what I learned right away.
Update 15 Sep 2025 2:01 PM
A couple of things I’ve learned since posting:
First, Jeff Johnson asked on Mastodon why I wasn’t using the item from Safari’s context menu.

The short answer is that I didn’t know it was there. This is what happens when you’ve been using software so long you think you know it all and don’t pay attention to minor updates.
I’m not certain how helpful this will be. Using it will add a step to my fragment-linking workflow, but maybe the extra step is small enough not to worry about. However that falls out, it’s good to know that menu item is there. Chrome has a similar context menu item; Firefox, as far as I can tell, does not.
Also on Mastodon, Juande Santander-Vela linked to an interesting post by Sangye Ince-Johannsen that talks about the value of text fragment linking and ties it to the wider problem of link rot. There’s no question but that fragment links are more likely to go bad than page links—even minor page edits can ruin a text fragment link. Ince-Johannsen’s solution is a little extreme for me, but it’s worth considering if you really need your links to survive. Me, I’ve kind of resigned myself to a certain degree of impermanence to the web. While I don’t like it when links here go bad, ANIAT is just a blog, and there’s a limit to what I’m willing to do to ensure link stability.
-
I thought I’d written a post about , but apparently not. I guess I’ll have to do that now. ↩
3D Mathematica graphics for the triangle problem
September 13, 2025 at 5:48 PM by Dr. Drang
As I often do, I thought it worthwhile to put up a quick post showing how I made the graphics in my previous post. The images were made in Mathematica, mainly through the Graphics3D command. The exception was the plot of 10,000 random points; that was done through ListPointPlot3D.
Here’s the notebook.
As typically happens, the graphics that you see in the notebook don’t match what was in the post, at least with regard to shading. That’s because the embedded notebook doesn’t evaluate the cells; it shows a kind of pre-evaluation skeleton view of the images that doesn’t account for lighting. It’s basically what I see when I first open my local copy of the notebook. I’ve reported this bug to Wolfram, and they seem to agree that it should be fixed, but my sense is that it’s not a high priority.
After evaluating the notebook, I right-click on the graphics cells to save the images to disk. Then I crop them, if necessary, and save them to the server.
Barycentric coordinates and random distribution of points
September 11, 2025 at 9:28 PM by Dr. Drang
This morning, John D. Cook posted an article about generating uniformly distributed points over the interior of a triangle. He offered three options, one that failed to distribute the points uniformly and two that succeeded. I want to talk about the failure.
In the failure, he used barycentric coordinates to describe locations within the triangle. These coordinates, which I called area coordinates (because that’s the terminology I learned 40 years ago) in a post written a few years ago are a set of three values in the [0, 1] range, each representing how close the point in question is to one of the triangle’s corners. You can follow the links to get more complete descriptions. One important characteristic of these coordinates is that they are not independent of one another—their sum has to equal one.
Cook’s failed approach (which he knew would fail) consisted of three steps:
- Generate random numbers α, β, and γ from the interval [0, 1].
- Normalize the points to have sum 1 by dividing each by their sum.
- Return αA + βB + γC.
where A, B, and C are the three corner points of the triangle.
He gives an example of randomly generated points and shows that this procedure doesn’t lead to a uniform distribution of the points over the interior of the triangle. But he doesn’t explain why, which is what I spent some time this afternoon exploring.
Cook’s first step generates uniformly distributed points in the unit cube that has one of its corners at the origin of the Cartesian coordinate system.
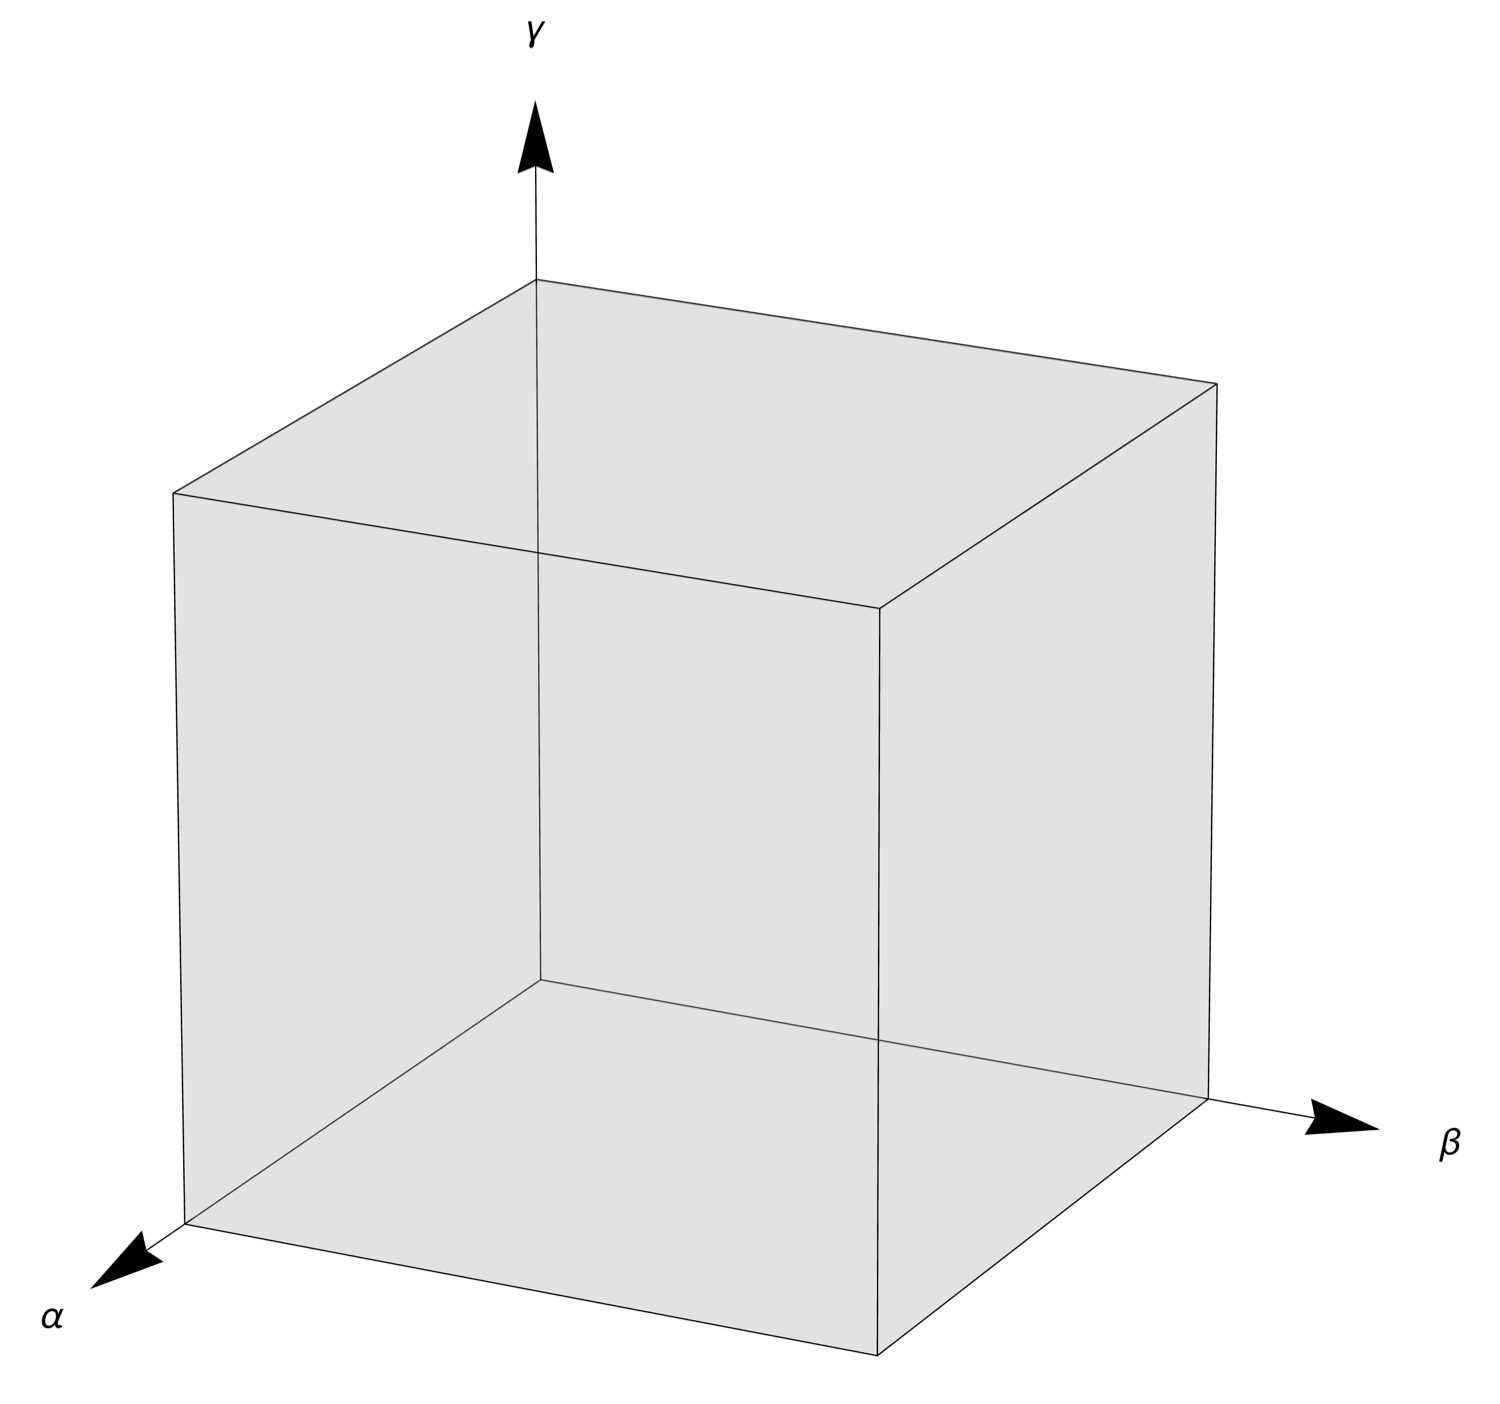
The normalization in the second step creates three new values, , , and , where
This projects the point onto the plane, which slices through the cube, making a tilted equilateral triangle whose corners are at the (1, 0, 0), (0, 1, 0), and (0, 0, 1) corners of the cube. I’m going to call this the normalization plane.
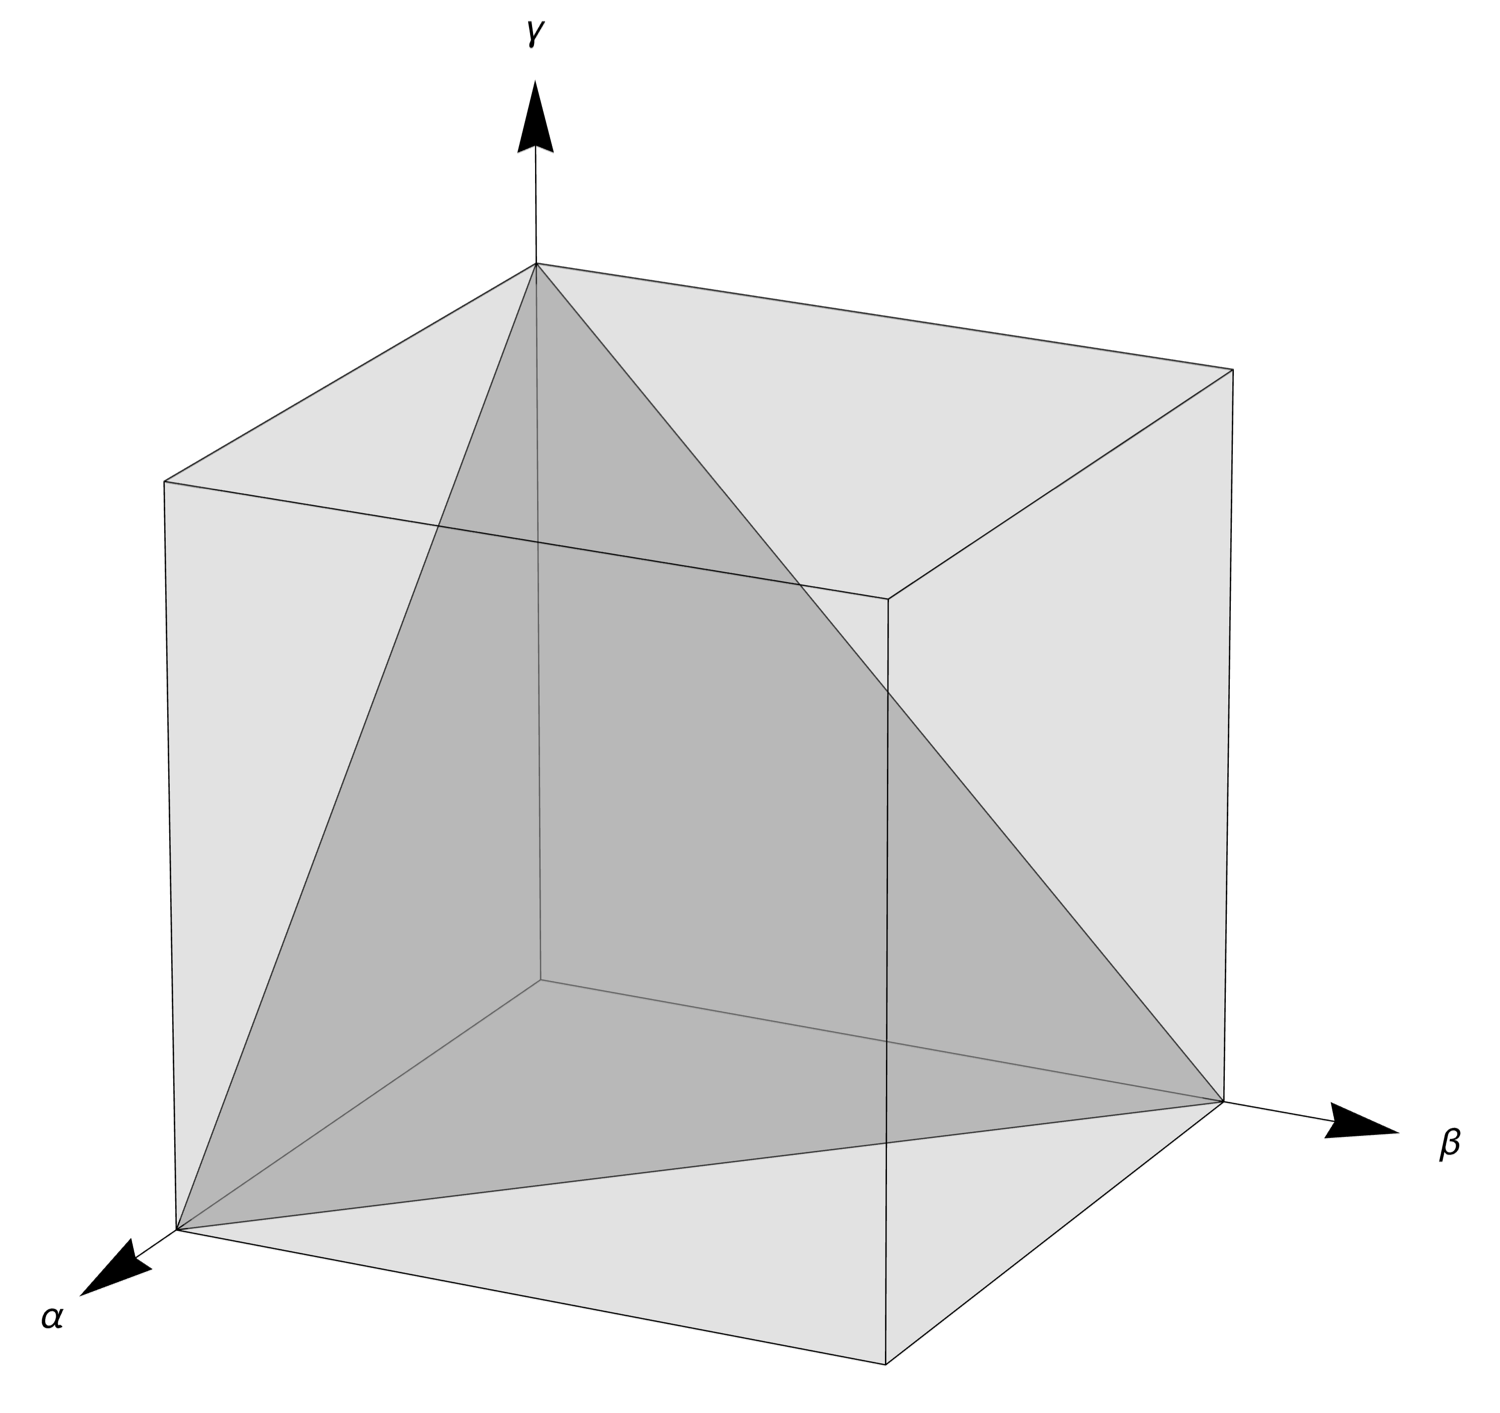
By “projection,” I mean the point is moved along the line defined by the point and the origin until it intersects with the plane. That movement could be either toward the origin or away from it, depending on which side of the normalization plane the original point lies. Here’s a figure that illustrates this idea:
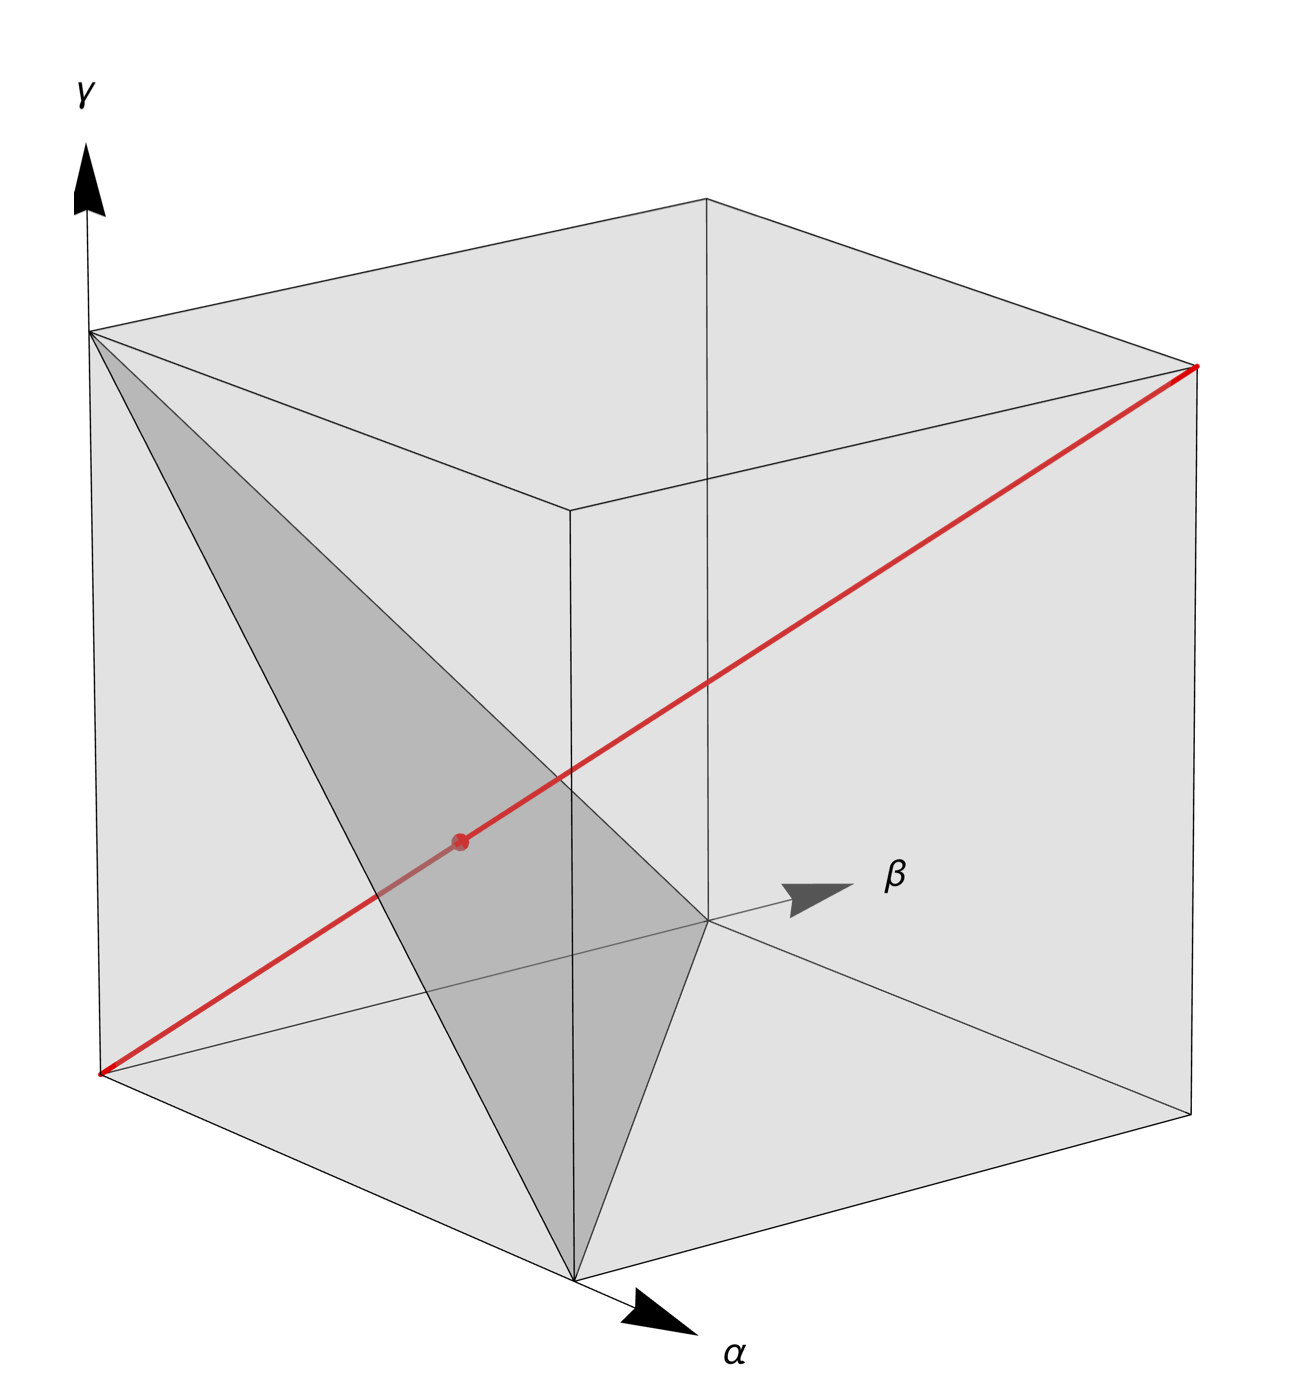
If the point generated in Step 1 lies anywhere on the red line, the normalization in Step 2 will move it to the red dot. I’ve changed the viewing angle so it’s easier to see that the red dot is on the normalization plane.
The line I’ve drawn above, which runs out from the origin to the opposite corner of the cube, is the longest such line that can be drawn. It’s length is . The shortest such lines, of which there are three, run out from the origin to the adjacent corner on an axis; they all have lengths of .
The lengths of the lines correspond to the relative likelihood of a point on the normalization plane being generated by the combination of Steps 1 and 2. So a point near the center, as in the image above, is 1.732 times as likely to be generated as a point out near one of the corners. This is how we get nonuniformity in the normalized points even though the original random points are uniform.
Here’s an illustration. I generated 10,000 points uniformly in the unit cube and normalized them. An isometric view looking toward the origin from the opposite corner of the cube shows the points on the normalization plane distributed like this:
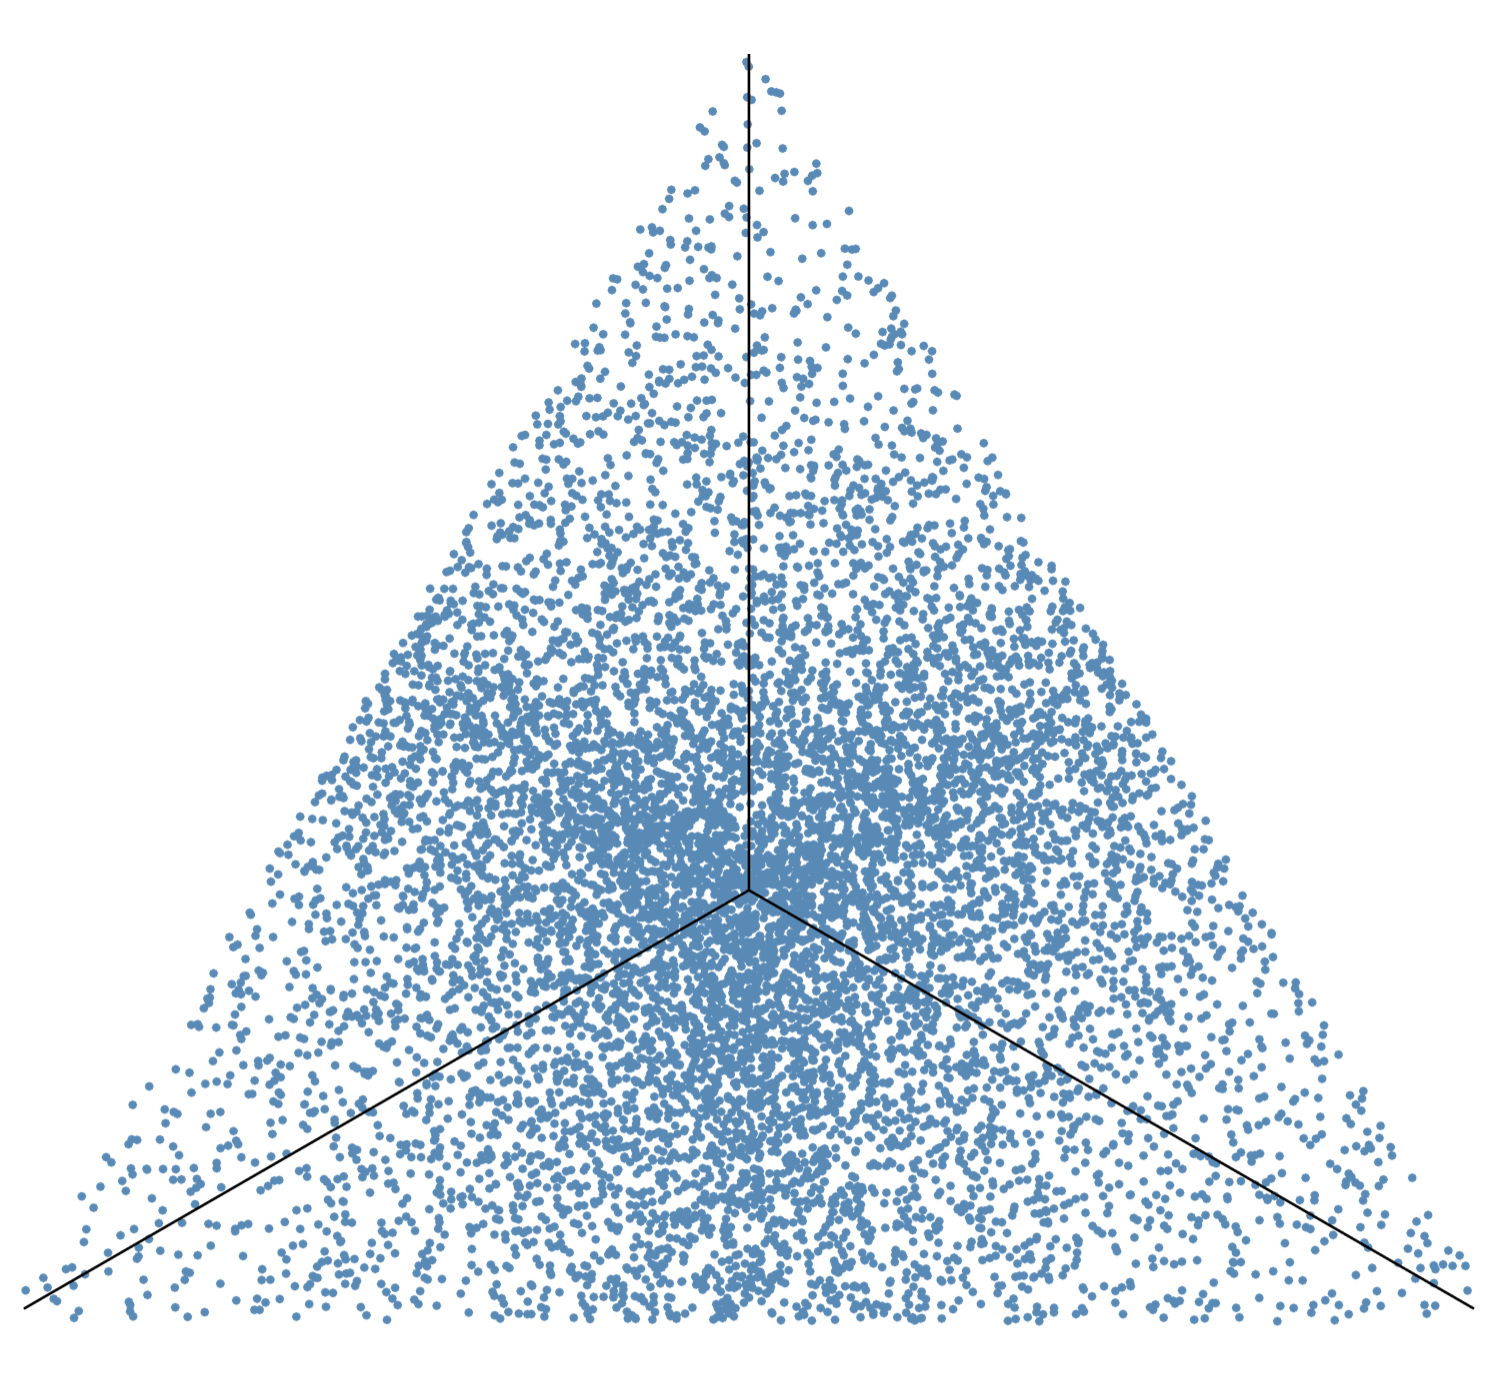
This matches the distribution over an equilateral triangle shown on this MathWorld page, which uses the same procedure we are.1
Cook’s final step is just a distortion of the above equilateral triangle to a more general triangle. If you look at his first figure, it should be pretty obvious how it’s just a squeezed, stretched, and rotated version of the figure above. The main features of the distribution—sparse near the corners, denser at the midsides, and densest at the centroid—are maintained through the distortion.
I suppose I could work out the joint probability distribution of the normalized coordinates using the technique I talked about in this post and this one. But my goal was to understand why the distribution had the pattern it does, not to work out all its mathematical details. Thinking about the line lengths got me there.
-
MathWorld calls them trilinear coordinates instead of barycentric or area coordinates. Varying nomenclature can be fun! ↩
Iowa jewel box bank 3
September 6, 2025 at 1:00 PM by Dr. Drang
I was in Cedar Rapids Wednesday afternoon to see the final Louis Sullivan jewel box bank in Iowa. It was kind of disappointing but still had some nice details.

The first disappointment was that the bank is now a restaurant with the 80s-style name of Peppercorn.1 This means the interior will be very different from the original. I say “will be” because the second disappointment was that the restaurant was closed, I couldn’t see the interior for myself. I thought about killing a couple of hours around Cedar Rapids and having dinner at Peppercorn, but it just didn’t seem worth it. I could see the true Sullivan details on the exterior.
Which leads to the third disappointment. The decorative border around the entranceway is missing. You can see a slightly different color in that area where the border used to be.

The now-missing entrance details can be seen on the building’s Wikipedia page, in a photo taken about 20 years ago.
Let’s move on to the good stuff. There are several nice terracotta accent pieces on the front and side façades.

At the time of construction, the bank’s name was People’s Savings Bank, and you can see the stylized initials in the center of the piece. The rough texture is carried through on the horizontal pieces under the windows and on some other accent pieces above the windows.
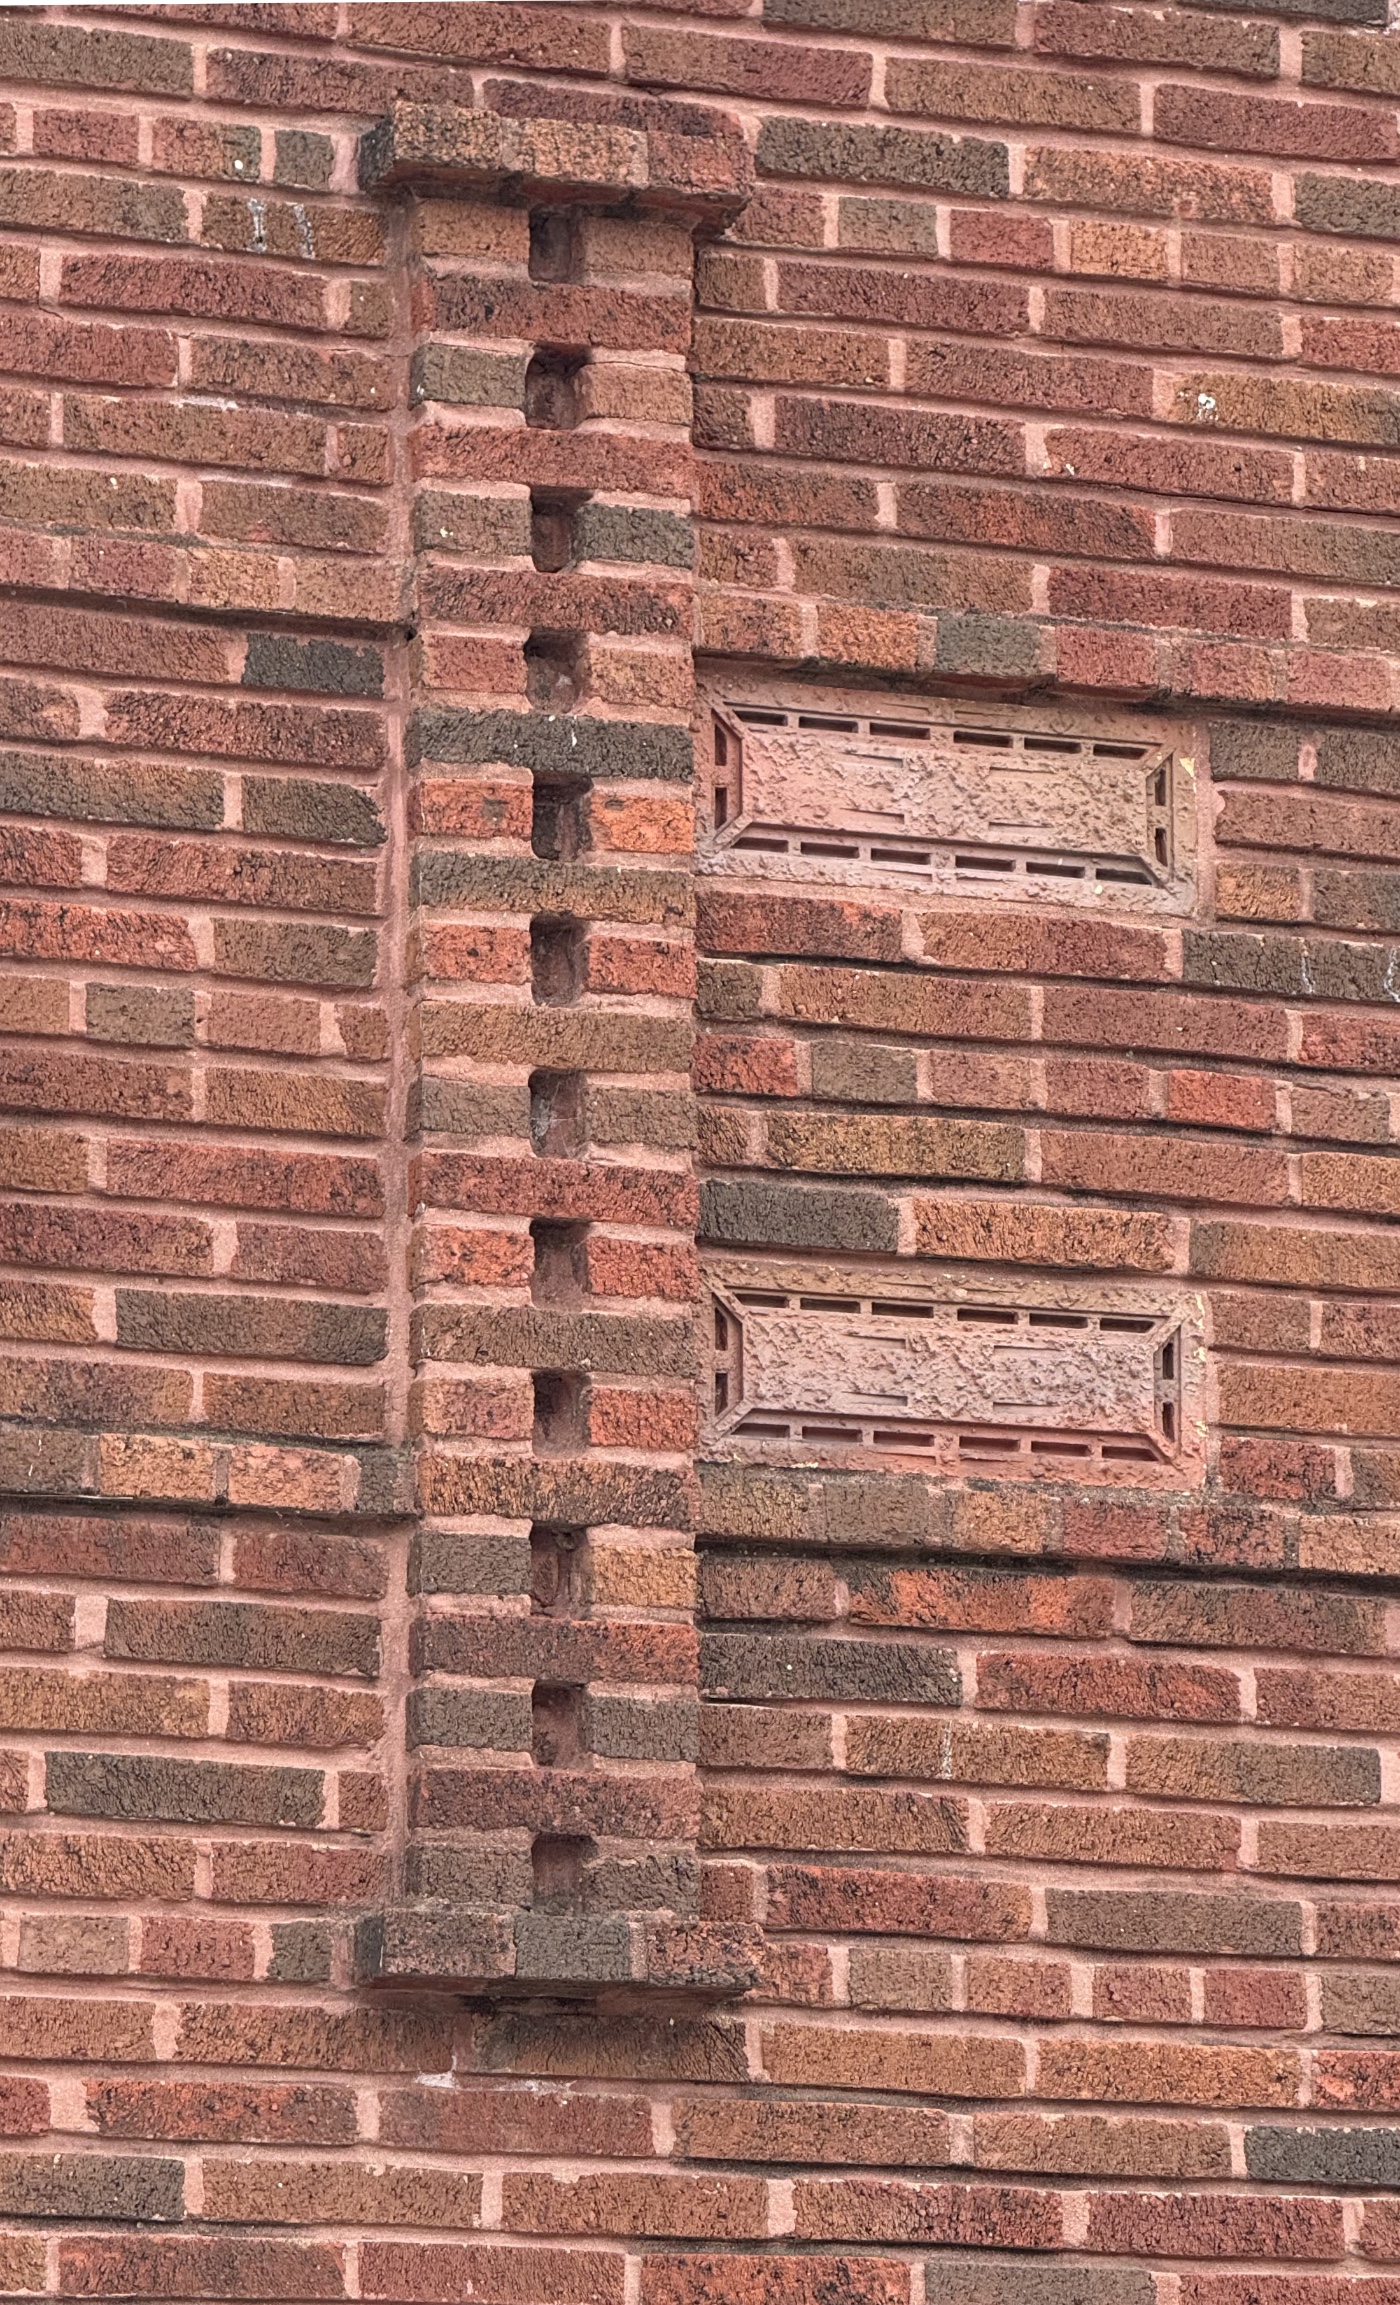
The square terracotta decorations on the chimneys are geometric and also have that rough texture on the outside surfaces.

I like the changing depth of the central diagonal lines. They start out nearest to us at the corners but duck under the other diagonals as they run into the middle diamond.
You can see all but the lower bit of the stained glass windows on the front façade.

The figures on the tops of the pilasters are grotesque lions. I like these more than the gilded and less stylized lions at the entrance of the Grinnell bank.

The photos on the Wikipedia page show that both the square grille and the lions used to be part of the decoration above the entrance.
Finally, there’s the historic landmark plaque in the doorway.

Eventually, I’m going to travel east to see the three jewel box banks in Ohio and Indiana. I’m holding off until the restoration of the one in Newark, Ohio, is finished.
-
Strictly speaking, if this were the 80s, Peppercorn would be the surname of the fictional owner, and the restaurant would be something like R.J. Peppercorn’s. Close enough. ↩
