
Just a little GTD with TextMate
July 24, 2006 at 10:22 PM by Dr. Drang
Last fall I wrote a two-part post (here and here) on GTD-style lists in text files using BBEdit. When I moved from BBEdit to TextMate earlier this year, I fell off the GTD wagon and left my lists behind. Things seemed to be fine for a while, but disorganization gradually set in.
Last week I hauled myself back up on the wagon—at least the list-making and -monitoring part—and rewrote a few list-handling things to work with TextMate. Although I could just write up the differences between last fall’s stuff and today’s, that would be too disjointed to follow, so this will be a complete description of my current system.
Before I get into it, though, I should mention that TextMate already has two (count’em, two) GTD list-managing bundles, GTD and GTDAlt. They are both under active development and definitely more featureful and automated than what I do. I prefer the simplicity and look of my system, but you should check them out to see if they fit your needs.
Another diversion: Before resurrecting my old system I tried a combination of Fiendish Master Plan and GeekTool, FMP for creating and sorting the list items and GT for providing an always-ready display of the lists on my desktop. The problem with this arrangement is that while FMP is great at adding items to lists (especially when combined with Quicksilver), does nothing to remove items when you’re done with them—you have to use your text editor to delete items. To my way of thinking, if I have to have the lists open in my editor for deletion, I might as well use the editor for insertion, too. Also, the format of my lists lends itself more to making nicely-printed index cards for my Hipster PDA.
OK, let’s get on with it. My lists are kept in a set of files inspired by David Allen’s “contexts.” Currently, I have
- work.md
- home.md
- car.md
- computer.md
all kept in a “gtd” folder in my home directory. The “md” file extension tells TextMate that these are Markdown files, which loads the Markdown bundle automatically when they are opened. A sample from my computer file is shown in this screenshot:
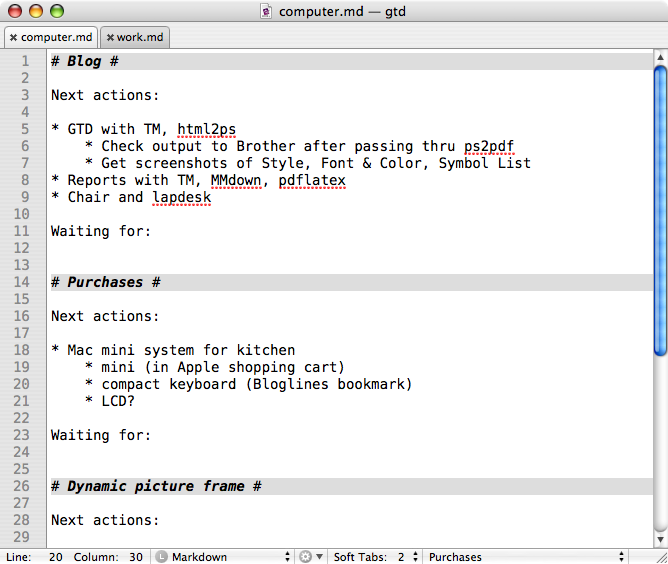
(You can click on the image to see it full-sized.)
The computer context has a few projects, each beginning with a level one (<h1>) heading. The projects are typically subdivided into two lists: Next Actions and Waiting For. I leave the Next Actions and Waiting For lines in the file even when they have no items because it emphasizes that they are empty.
You’ve probably noticed that my headings aren’t styled the way your Markdown heading are, even if you, like me, are using the IDLE theme. I’ve never liked the way headings are styled in the Markdown bundle, so I made some local changes to get what I want. First, I changed the “markup.heading.markdown” pattern in the Markdown Language definition to
{ name = 'markup.heading.markdown';
  match = '^#{1,6}\s*(.*?)\s*#*\s*\n';
  captures = { 1 = { name = 'markup.headingtext.markdown'; }; };
},
and the Symbol List: Heading preference to
{ showInSymbolList = 1;
  symbolTransformation = "
    s/\s*#*\s*\z//;         # strip trailing space and #'s
    s/(?<=#)#/ /g;          # change all but first # to m-space
    s/^#( *)\s+(.*)/$1$2/;  # strip first # and space before title
  ";
}
I then added this Style: Heading preference
{ background = '#DDDDDD';
  foreground = '#000000';
}
to create the light gray background bar that runs across each heading. I stole this idea from the TextMate bundle. Allan Odgaard uses something similar to break up the TextMate release notes (and there have been a lot of those lately, haven’t there?) into sections. Finally, I added a “markup.heading.markdown” element to the IDLE theme in TextMate’s preferences
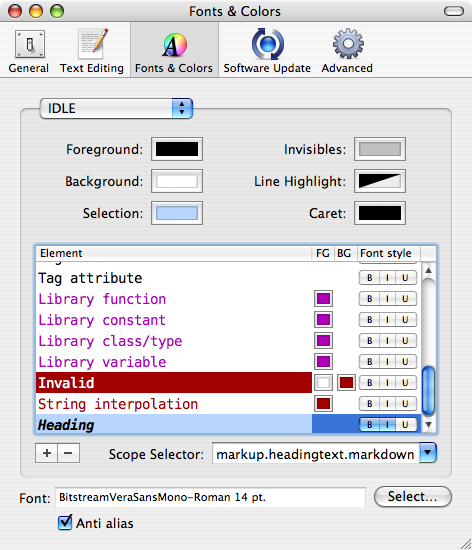
to make the heading text bold and italic.
At this point, I’m basically done with the infrastructure for managing lists in TextMate. When I open the “gtd” folder a new window comes up and the names of all the context files are listed in the project drawer on the side. I open these context files as needed by clicking on them, and they open in their own tabs. (One of TextMate’s real advantages over BBEdit is that it has real tabs.) I switch contexts by clicking on the tabs and navigate to individual projects either by scrolling or by using the nifty popup menu at the bottom right corner of the window.
But wait, there’s more! Since I’m not in front of a computer 24 hours a day—my iBook keeps sliding around on the handlebars of my bike—I need printed versions of my lists for when I am sans ordinateur. I could, of course, use the Markdown bundle’s Preview command to show the lists as rendered HTML and then print the Preview window, but that wouldn’t be very cool and the printed list wouldn’t fit in with my HPDA.
Enter html2ps , a program written by Jan Kärrman that—duh—creates PostScript output from HTML input, and hpdaprint, a poorly-named program written by me that glues together Markdown, html2ps, and the standard utility lpr to print my lists onto index cards.
We’ll look at html2ps first. I downloaded it from the link above and put it in /usr/local/bin, which is in my $PATH. Although html2ps has reasonable defaults for font size, margins, etc., if you want to print to something other than a full-sized sheet of paper—and we do—you have to create a configuration file. Mine is called “html2psrc-hpda” and it’s kept in my home directory. Here the listing:
/* Configuration file for html2ps.
   Meant for printing out on index cards.
*/

@html2ps {
}

/* Standard style sheet definitions */
body    { font-family: Times;
          font-size: 10pt; }
H1, H2  { font-family: Helvetica;
          font-size: 12pt;
          font-weight: bold; }
@page   { size: 8.5in 11in;
          margin-left: 3in;
          margin-right: 3in;
          margin-top: .25in
          margin-bottom: 6.25in}
As you can see, it’s very much like a CSS file. The margins are set to print on a 5×3 inch area at the top of the page. This allows me to pipe html2ps’s output to my printer as a manual feed job and it will print nicely on a portrait-oriented index card fed into the multipurpose tray.
We’re in the home stretch now. My hpdaprint script takes Markdown input, turns it into HTML, then pipes it through html2ps and sends it to the printer via lpr. Here it is.
#!/usr/bin/perl

use lib "$ENV{'HOME'}/bin";

# The print command to which the output is piped.
my $printer = "lpr -o ManualFeed=true";

# The top of the HTML document.
my $top = <<'TOP';
<html>
<head>
</head>
<body>
TOP

# The bottom of the HTML document.
my $bottom = <<BOTTOM;

</body>
</html>
BOTTOM

# Slurp in the text and filter it through Markdown.
my $original;
{
  local $/;
  $original = <>;
}
use Markdown;
my $middle = Markdown::Markdown($original);

# Put page break comments before each <h1> except the first. Have to
# insert the comments from back to front to keep the offsets correct.
my @offsets = ();
my $position;
while ($middle =~ m/<h1>/g) {
  unshift @offsets, pos($middle) - 4;   # collect in reverse order
}
pop @offsets;                           # get rid of last (first) one
for $position (@offsets) {
  substr($middle, $position, 0, "<!--NewPage-->\n");
}

# Form the HTML and send it through the pipeline.
my $html = $top . $middle . $bottom;
open OUT, "| /usr/local/bin/html2ps -f ~/html2psrc-hpda | $printer";
print OUT $html;
I keep this script in my ~/bin directory, which is in my $PATH. There are probably only two interesting things about it:
- It uses a
Markdown.pmmodule that I keep in my~/bindirectory—more on this later. - It puts a special page break comment before each
<h1>tag. This doesn’t affect the HTML rendering, but it does tell html2ps to put the individual lists within a context file onto separate pages.
What is Markdown.pm? It’s an edited and renamed version of John Gruber’s standard Markdown.pl file that I made so I can call the Markdown function from within my own Perl programs. The difference between the two files is that Markdown.pm has all the Movable Type, Blosxom and command-line stuff cut out. Here’s what it looks like in the edited area:
# (see _ProcessListItems() for details):
my $g_list_level = 0;       # line 65 in original

# This is where I cut out the Blosxom, Movable Type,
# and command-line stuff.

sub Markdown {              # line 226 in original
#
# Main function. The order in which other subs are called here is
# essential. Link and image substitutions need to happen before
For context, I’ve shown a few lines above and below the edit. This was taken from Markdown version 1.01; the lines labeled 65 and 226 may move a bit in later versions.
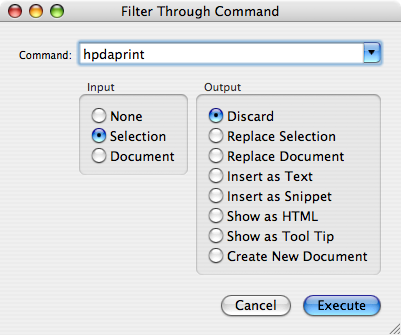
To print a series of index cards with the project lists from a particular context:
- Make that context file the current file.
- Select Filter Through Command… from the Text menu.
- Choose an Input of Document, and Output of Discard and type “hpdaprint” in the Command box.
- Click the Execute button and start feeding your index cards into the printer. There is no Print dialog box to navigate, hpdaprint handles all that.

To print the list from only one project in a context file:
- Select the text of that project, including its heading.
-
- Select Filter Through Command… from the Text menu.
- Choose an Input of Selection, and Output of Discard and type “hpdaprint” in the Command box.
- Click the Execute button and start feeding your index cards into the printer.
(Aside: hpdaprint works for me as written because PostScript printers are my default printers for both my work and home computers. If you want to print your lists to a non-PostScript printer, you’ll have to convert html2ps’s output to some other format. Since both my printers are PostScript, I don’t have any real-world experience with this, but my guess is that you could change the line
open OUT, "| /usr/local/bin/html2ps -f ~/html2psrc-hpda | $printer";
to
open OUT, "| /usr/local/bin/html2ps -f ~/html2psrc-hpda | \
ps2pdf - | $printer";
and get your printer to work. This is assuming you have installed ps2pdf.
Also, if you want to print your index cards on a printer that isn’t the default, you’ll have to change the line
my $printer = "lpr -o ManualFeed=true";
to
my $printer = "lpr -P otherprinter -o ManualFeed=true";
replacing “otherprinter” with your printer’s name.)
There are probably other things to say about my setup, but I’m tired of typing. If I see any glaring errors or omissions, I’ll fix them up in the next day or two.