
Leopard screen sharing over the internet
February 15, 2008 at 3:11 PM by Dr. Drang
Apple’s description of Leopard’s new screen sharing feature suggests that it can only be done over a local network. But it can also be done over the internet. This hint at <macosxhints.com> shows one way to do it, but it’s pretty terse, and the comments afterward are pretty confusing. In this post, I’ll explain how I have screen sharing set up to operate my iMac at work from my iBook at home (or a hotel, or Starbucks, etc.)
Motivation
Screen sharing allows you to see the screen of a remote computer in a window on your local computer (the one in front of you) and operate it using keystrokes and mouse clicks. Because of network delays and, possibly, differences in screen size between the two computers, operating the remote computer through screen sharing will not be as smooth as if you were operating it directly, but it’s pretty close.
Because the Mac is a Unix computer at heart, you can do a lot of work on a remote Mac without screen sharing. Connecting via SSH (secure shell) will let you issue Terminal commands to your remote computer without viewing the remote Desktop at all. With years of experience at the Unix command line, I often find this sort of connection to be just fine. But there are times when the full graphical interface is needed, and that’s when screen sharing shines.
In addition to operating one of your own computers remotely, another great use of screen sharing is to assist someone else with his or her computer. Telling people over the phone where to click and what to type can work, but there’s nothing like moving their mouse yourself. Screen sharing will be a boon to those who act as informal technical support for their family.
Before we get into the details, I want you to know that these instructions assume two things:
- Both computers are running Leopard. While there are definitely ways to do screen sharing between Tiger and Leopard, Tiger and Tiger, Leopard and Linux, etc., I won’t be covering them here.
- The computer you want to control remotely is on a local area network that uses network address translation (NAT) to present a single IP number to the outside world. While I think I know how to set up screen sharing on a computer with its own publicly-addressable IP number, I haven’t done it and don’t want to give the impression that I have.
If your computer and network arrangement doesn’t match these two criteria, the information here may still be useful, but you’ll have to adapt it to your own situation.
Setting up the base computer
By “base computer” I mean the one you’re going to be operating by remote control. In my case, it’s my computer at work. There are three things you need to do with this computer before you can screen share from somewhere else.
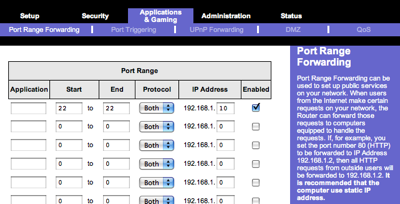
First, you have to configure your router for port forwarding. Every router I’ve used has its own webserver and can be accessed and configured through a browser. I have a Linksys router, and the port forwarding configuration page looks like this
If you already understand NAT and port forwarding, skip ahead a few paragraphs. Otherwise, I’ll try to give you a brief explanation.
The idea behind NAT is this: To the outside world, the local area network (LAN) in your house or your office presents just one IP number. Within the LAN, however, each computer has its own IP number, taken from a group of numbers that have been set aside for LAN access only. These LAN IP numbers typically start with 192.168.1., and each computer on the LAN has its own final number. The router translates between each LAN number and the single publicly addressable number every time it handles data going into or out of the local area network.
Port forwarding provides a way to tunnel through the router from the outside to get to a particular computer on the LAN. Each packet of data coming to your router from the outside world carries with it a “port number,” which is meant to indicate which network service it’s supposed to go to. A port number of 80 will typically go to a webserver, a port number of 110 to a mail server, and so on.1
We want data on the SSH port, 22, to be forwarded by the router directly to the computer we want to control remotely. The configuration shown above directs all data on port 22 coming to the router to port 22 on the computer with the local IP number of 192.168.1.10. This is just an example. You’ll need to know the local IP number of the computer you want to control remotely and enter that instead of 192.168.1.10.
If the base computer gets its LAN IP number dynamically from the router through DHCP, you might want to consider switching it to a static LAN IP number so you don’t have to worry about the IP changing the next time you restart the computer or the router. I don’t want to go through the instructions for doing that here, but I will tell you that it’s done through the Network Preference Pane and is pretty simple.
Before you leave the router, you should take note of the IP number it presents to the outside. We’ll need it later.
With port forwarding set up on your router, you’ll need to open the Sharing Preference Pane on the base computer and turn on Remote Login.
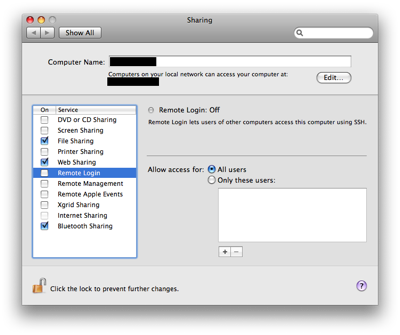
The SSH server is now running, and you can log in from anywhere and issue Terminal commands.
Finally, you need to turn on Screen Sharing in the Sharing Preference Pane.
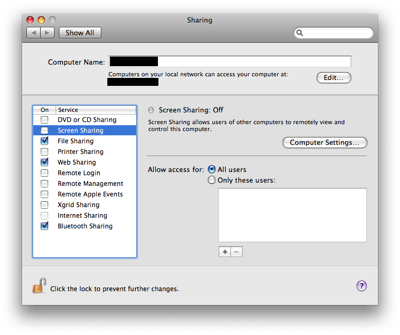
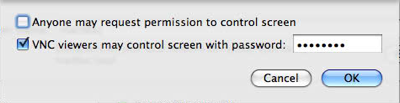
This starts a VNC (virtual network computing) server that will allow remote control of the base computer through a graphical interface in addition to the command line. Click the “Computer Settings…” button, choose the “VNC viewers may control screen with password” checkbox and enter a password.
OK, now your base computer is set up so you can share its screen from another computer. Let’s move on.
Setting up the satellite computer
By “satellite computer,” I mean the computer you use when remotely controlling the base computer. Fortunately, this setup is easier than the base computer setup.
First, you want to establish an SSH tunnel between the base computer and the satellite. This can be done from the Terminal with a command like this:
ssh -L 6900:127.0.0.1:5900 -N user@666.666.666.666
The 666.666.666.666 at the end of the command must be replaced by the publicly-addressable IP number of the base computer’s router. Remember when I asked you to take note of that number? Here’s where you need it. The user part is your short user name on the base computer; if it’s the same as on the satellite, you can omit the user@ part. The -N option tells ssh that we won’t be issuing any remote commands, just forwarding data.
The -L 6900:127.0.0.1:5900 is where all the interesting stuff goes on. What it says is that anything that happens on port 5900 of the base computer should be made available on port 6900 of the satellite computer. The special IP address, 127.0.0.1, always refers to the computer on which the command is being issued, the satellite in this case. Port 5900 is the standard VNC port, and the VNC server on the base computer is communicating through that port. Port 6900 was an arbitrary choice; it could be any port on the satellite computer that isn’t being used for something else. I chose 6900 simply because it rhymes with 5900.
After issuing this command (and giving the password for the base computer), go back to the Finder and choose Connect to Server… from the Go menu. When the Connect to Server window comes up, enter vnc://127.0.0.1:6900 in the Server Address field and press the Connect button. If everything is working, the Screen Sharing application will start and you’ll see the screen of the base computer in a window on the satellite computer. Congratulations! You can now run the base computer by remote control.
Notes, suggestions, and caveats
There seems to be an odd bug in the Screen Sharing application. Since my iMac screen is much bigger than my iBook screen, Screen Sharing starts out with a scaled view of the iMac screen. Despite the reduced size of everything, I kind of like this view because I can see the whole iMac desktop without scrolling. Unfortunately, mouse clicks and keystrokes don’t seem to register—the window doesn’t update. The workaround I’ve discovered is to choose Turn Scaling Off from the View menu (which zooms in to a full-sized view of a portion of the iMac screen) and then immediately change back by choosing Turn Scaling On. Now everything works as it should.
It’s possible that SSH tunneling is unnecessary. My experience with VNC on Linux was that the VNC protocol was unencrypted, so all the data was passing through the internet in the clear. Running VNC through an SSH tunnel was more secure because it encrypted the data before passing it along the network. The Screen Sharing application has a preference setting for encrypting all data, which may be just as secure as running everything through a tunnel. If that’s the case, you could just apply port forwarding to port 5900 at the base computer’s router and connect from the satellite to the router’s publicly-addressable IP number. But for now I’m going to stick with the security I’m familiar with. Also, I sometimes tunnel other ports through SSH, which can be very nice for things like directly accessing my work computer’s web server.
In fact, I use SSH tunneling enough that I’ve written a shell script to make setting up tunnels to my work computer easier. It’s called “worktunnel” and is not much more than a one-liner:
1:  #!/bin/bash
2:
3:  # Usage: worktunnel localport remoteport
4:
5:  ssh -L $1:127.0.0.1:$2 -N 666.666.666.666
Obviously, the last IP number is replaced my my office’s real IP number. This is barely a script; its value is just that it cuts down on the typing and shields me from having to remember every detail of the command’s syntax. For screen sharing, I just type
worktunnel 6900 5900
and I’m off and running. For accessing my work computer’s webserver, I type
worktunnel 8080 80
and then a URL of http://localhost:8080/path/to/page.html on my iBook points to /path/to/page.html on my iMac. Magic!
Update
Two followup posts regarding Screen Sharing bugs and related matters here and here.
-
I believe the word “port” was chosen many years ago to be analogous to the connections on the back of a computer. There were serial ports, parallel ports, etc. Each carried a different type of data that the computer was supposed to handle; the port it came in through determined how the bundle of data was to be handled. ↩