TrueType fonts for the Python Imaging Library
November 12, 2008 at 9:28 AM by Dr. Drang
I’m gearing up to rewrite my photo indexing program again, and I’ve run across a problem in using TrueType fonts on the Macintosh with the Python Imaging Library. Fortunately, there’s a simply remedy.
In the beginning…
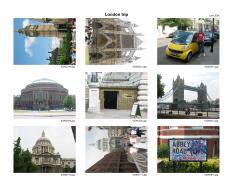
Back in 2000 or so, I wrote a Python program that took a bunch of JPEGs and created a new set of JPEG files (index pages) with reduced-size versions of the originals laid out in a matrix and labeled with their file names.

I called the program “photopage” and wrote about it here.
Over the years, I’ve rewritten the program several times. I’ve
- changed the language from Python to Perl to Ruby;
- changed the underlying library from the Python Imaging Library (PIL) to ImageMagick;
- changed the output from JPEG to PDF and back; and
- changed the output paper size from 8½×11 to 8×10.
Most of these rewrites were done to support different ways of printing the index pages, but sometimes I was trying to get the program to run faster and sometimes I was trying to learn a new language and/or library. The last rewrite was called “photosheets” and I described it here. That was two years ago, so I’m antsy to do another rewrite.
Fonts in PIL
I’ve decided to go back to Python and PIL. Overall, I liked PIL more than ImageMagick but didn’t like PIL’s need for specially-formatted bitmap fonts for every size and resolution. Now that PIL can use TrueType fonts, I’m eager to go back to it as I’ll have more freedom in laying out the image labels and captions.
PIL’s function for loading a TrueType font is in the ImageFont module:
ImageFont.truetype(file, size)
where file is path to the .ttf file and size is the font size in points. Unfortunately, many of the system fonts on the Macintosh don’t have a .ttf file. If you look in /System/Library/Fonts/, for example, you’ll find a Helvetica.dfont, but no Helvetica.ttf. The .dfont format is a Mac-specific thing that, among other things, binds together the .ttfs for all the variants of the font.1 The TrueType information for each variant is inside Helvetica.dfont, but PIL isn’t smart enough to know how to extract it.
Fondu to the rescue
Luckily, a smart programmer named George Williams wrote a neat little command-line utility that creates .ttfs from .dfontss. It’s called “fondu”, and you can download it here. Williams provides Mac, Linux, and source versions of the program; the Mac version is a package that installs itself in /usr/local/bin/. Don’t be worried that the last update was three years ago—the program works fine on Leopard.
Because fondu creates several files, I recommend you create a new folder before running it. Then open Terminal, cd your way into that new folder in the Terminal, and run something like
fondu /System/Library/Fonts/Helvetica.dfont
using the full path to whatever font you’re interested in as the program’s argument. For the command above, I got 20 new files:
Helvetica-10.bdf               HelveticaCE-12.bdf
Helvetica-12.bdf               HelveticaCE-14.bdf
Helvetica-14.bdf               HelveticaCE-18.bdf
Helvetica-18.bdf               HelveticaCE-24.bdf
Helvetica-24.bdf               HelveticaCE-9.bdf
Helvetica-9.bdf                HelveticaOblique.ttf
Helvetica.ttf                  Untitled1-13.bdf
HelveticaBold.ttf              Untitled2-13.bdf
HelveticaBoldOblique.ttf       Untitled3-11.bdf
HelveticaCE-10.bdf             Untitled4-11.bdf
The .bdf files are text files that contain bitmap versions of the font at various sizes. BDF is a Unix standard for X Windows. The four .ttf files are what we’re after. PIL works happily with them.
Looking ahead
I’m not sure of the best place to save the .ttfs. I’m certain I don’t want them in /System/Library/Fonts/ or anywhere the Mac normally looks for fonts, because I don’t want duplicates. I’ll probably end up saving them with the PIL library in /Library/Python/2.5/site-packages/.
-
For Helvetica, the variants are Regular, Bold, Oblique, and BoldOblique. ↩
