One-step watermarking service
February 28, 2013 at 10:16 AM by Dr. Drang
I wanted a one-step command that would put a big “DRAFTS” watermark on every page of a PDF document. Ideally, the command would work this way:
- I select the PDF to be watermarked in the Finder.
- I right-click and choose “Draft” from the Services submenu.
- I end up with a new watermarked file in the same folder as the original. The new file has the same name as the original but with “draft” appended to it.
A less than ideal, but still acceptable, solution would be one in which the original file gets watermarked and saved in place. I could always make a duplicate beforehand and watermark it.
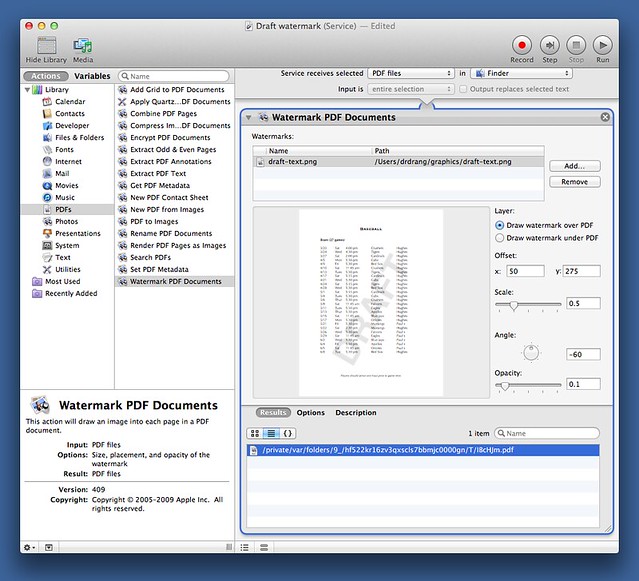
I had hopes that this would be a simple Service to build, because I knew there was a “Watermark PDF Documents” action in Automator. I was a little disappointed to find that it would use only bitmapped images—like PNGs or JPEGs—for the overlay instead of crisp and infinitely scalable PDF images, but I could live with that. What I couldn’t live with was Automator’s inability to put the watermarked file where I wanted it.
The problem with the built-in watermarking action is that, unlike many of the other image actions, it doesn’t change the file in place. It creates a copy that’s off in some subdirectory of /private/var/.
I could, of course, move this new file and rename it, but at this point in the workflow the original file’s name and folder are lost, so they’re not available anymore. I’m sure there’s a way to save the file and folder names in variables before adding the watermark and then retrieve them later for the moving and renaming operations, but it looks like I’ll have to drop down into AppleScript to do that. And if I need to write an AppleScript, I’d rather just write the whole thing as a script instead of bouncing back and forth between actions and scripts. So I needed another workflow.
I didn’t have to look far. I’d already been using PDFpenPro’s “Imprint All Pages With Image…” script. The workflow with this script is
- Open the original PDF in PDFpenPro.
- Choose the Imprint All Pages With Image… command from the scripts menu.
- Choose the graphic I wanted to imprint, a file named
draft.pdf. - Save the newly watermarked file under the same name but with “draft” appended to it.
This process worked well, but you can see why I wanted to automate it: too much me in every step. The nice thing was that I knew this script would have most of what was needed to take me out of it.
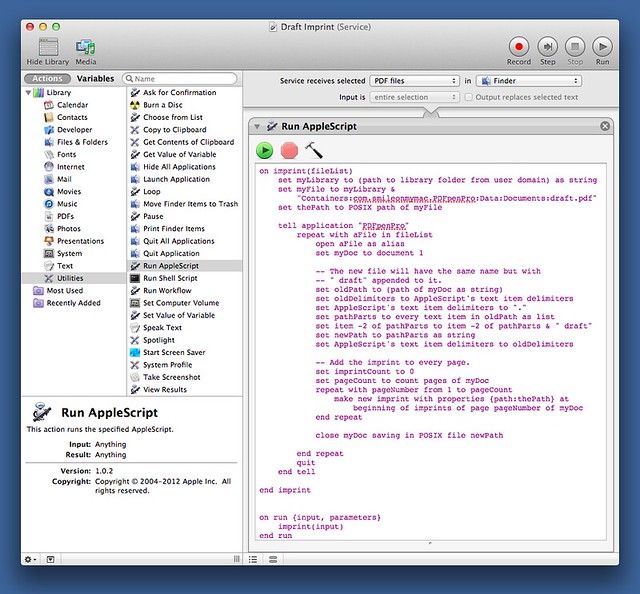
What I ended up with was this Service, which is basically just one AppleScript that accepts as input a set of PDF files selected in the Finder.
The AppleScript is this:
applescript:
 1:  on imprint(fileList)
 2:    set myLibrary to (path to library folder from user domain) as string
 3:    set myFile to myLibrary & "Containers:com.smileonmymac.PDFpenPro:Data:Documents:draft.pdf"
 4:    set thePath to POSIX path of myFile
 5:
 6:    tell application "PDFpenPro"
 7:      repeat with aFile in fileList
 8:        open aFile as alias
 9:        set myDoc to document 1
10:
11:        -- The new file will have the same name but with
12:        -- " draft" appended to it.
13:        set oldPath to (path of myDoc as string)
14:        set newPath to (text 1 thru -5 of oldPath) & " draft.pdf"
15:
16:        -- Add the imprint to every page.
17:        set imprintCount to 0
18:        set pageCount to count pages of myDoc
19:        repeat with pageNumber from 1 to pageCount
20:          make new imprint with properties {path:thePath} at beginning of imprints of page pageNumber of myDoc
21:        end repeat
22:
23:        close myDoc saving in POSIX file newPath
24:
25:      end repeat
26:      quit
27:    end tell
28:
29:  end imprint
30:
31:
32:  on run {input, parameters}
33:    imprint(input)
34:  end run
The on run section in Lines 37-39 is the standard template for AppleScripts in Automator. The interesting part is the imprint function.
First, of course, we need a PDF file to use as our imprint. I used the same file as before, draft.pdf, which consists of the word DRAFT in 144-point Helvetica, rotated at a 60° angle and set to an opacity of 10%. I made it in OmniGraffle, but I’m sure it could be made in any number of programs. The most important thing is its opacity setting. The imprint graphic will be placed on a layer above the original page, so it needs a lot of transparency to allow the original page to show through.
Lines 2-4 establish where draft.pdf is stored. It’s in a bizarre location, deep inside the ~/Library/Containers/ folder. This is an unfortunate consequence of sandboxing. If the user chooses the imprint file, as she does in Smile’s Imprint All Pages With Image… script, the imprint file can be anywhere because the system knows that the user chose it. But when the imprint file is built into the script, it can only be within PDFpenPro’s sandbox. That sandbox is inside the ~/Library/Containers/com.smileonmymac.PDFpenPro folder. It’s a brave new world for scripters.
Lines 11-19 are, in a nutshell, why I hate AppleScript. All it does is take /path/to/original.pdf and generate /path/to/original draft.pdf, but because AppleScript’s text handling capabilities are so shitty, it takes several lines to do what in any decent language would be a simple regex substitution. Anyway, at the end of this section we have the full path to the watermarked file we’re going to create.
Update 3/1/13
Thanks to Arjan in the comments, Lines 11-14 are a significant improvement over my original code (still in the screenshot), which used the dreaded text item delimiters construct. I still hate AppleScript, though.
Lines 16-21, as well as the overall repeat structure, are stolen directly from Smile’s Imprint All Pages With Image… script. Thanks to the wonders of sandboxing, that script is in the absurdly deep
/Users
  /username
    /Library
      /Containers
        /com.smileonmymac.PDFpenPro
          /Data
            /Library
              /Application Support
                /PDFpenPro
                  /Scripts
folder.1 By the way, if you want to add your own scripts to PDFpenPro’s scripts menu, this is where you’ll have to put them.
Finally, Line 23 saves the watermarked file where we told it to in Lines 11-14.
One of the nice features of this script is that it centers the watermark for you, which means it’ll work just as well for landscape-oriented originals as it does for portrait-oriented originals.
If you have a need for this sort of workflow, you can build it yourself or download this zip file. It contains the Draft Imprint.workflow, which you’ll have to drag to your ~/Library/Services/ folder, and the draft.pdf imprint file, which you’ll have to drag to
/Users
  /username
    /Library
      /Containers
        /com.smileonmymac.PDFpenPro
          /Data
            /Documents
If you have PDFpen instead of PDFpenPro, this should still work, but you’ll have to change Lines 3 and 6 of the script to delete the “Pro” parts of the name. Also, the draft.pdf file will have to be stored under …/com.smileonmymac.PDFpen/…
-
As I write, the PDFpenPro documentation is wrong about the location of these scripts. It still gives the pre-sandbox location. I learned the new location by sending a support email to Smile. ↩


